
Controller Trigger Test
Test left and right controller triggers online. Check LT/L2 and RT/R2 analog pressure values in real time.
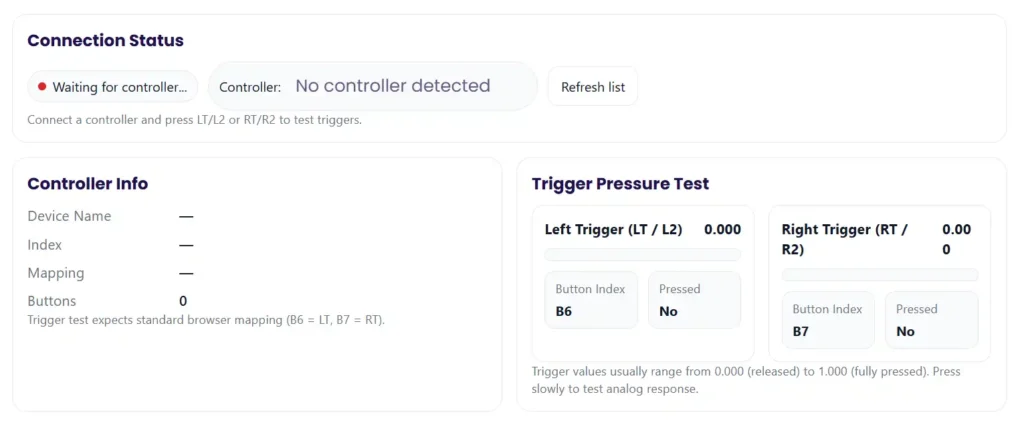
Connection Status
Connect a controller and press LT/L2 or RT/R2 to test triggers.
Controller Info
Trigger test expects standard browser mapping (B6 = LT, B7 = RT).
Trigger Pressure Test
Trigger values usually range from 0.000 (released) to 1.000 (fully pressed). Press slowly to test analog response.
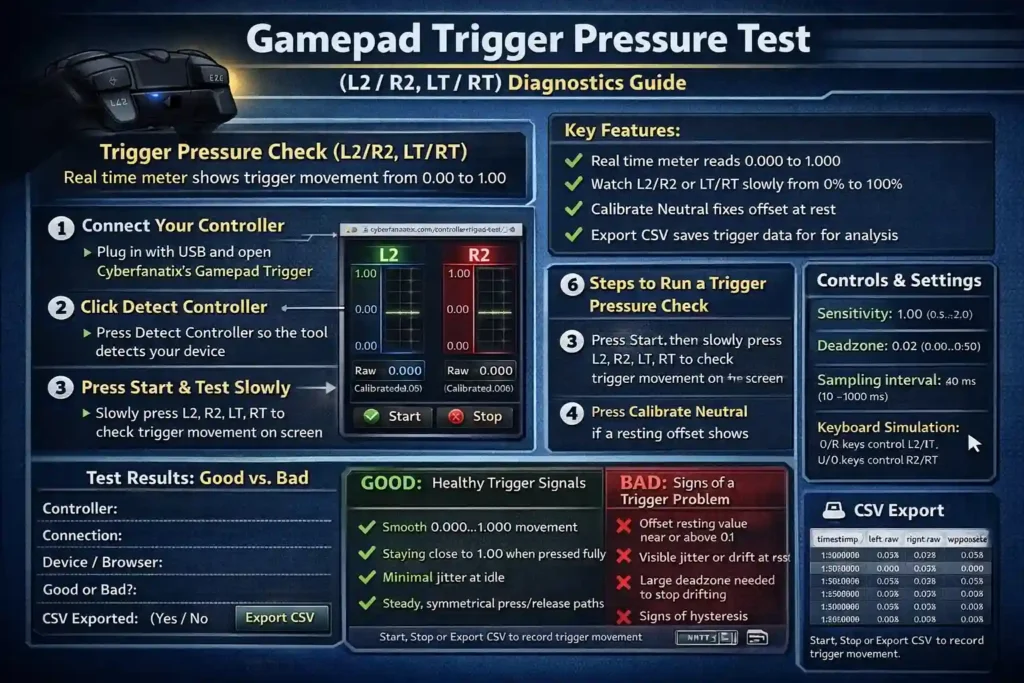
I use this tool when I want to check trigger pressure on my controller. It shows how much the gamepad triggers move when I press L2, R2, LT, or RT. The real time meter displays values from 0.00 to 1.00, so I can see trigger sensitivity while pressing slowly or fully. It runs in the browser using the Gamepad API, so results may change by OS or browser. For consistent readings, I usually connect the controller with USB.
Key Points From the Trigger Pressure Test
I keep a few quick things in mind when I test trigger pressure on gamepad triggers like L2, R2, LT, and RT.
- The real time meter shows trigger pressure from 0.000 to 1.000 while I press the trigger.
- I click Detect Controller, then Start, and press the trigger slowly from 0% to 100% to check sensitivity.
- I use Calibrate Neutral and add a small deadzone if the trigger shows tiny movement when I am not touching it.
- I export the CSV file to check jitter, max travel, and trigger movement data instead of guessing.
- I sometimes test on another device or tool to see if the problem comes from the controller or the system.
- Different vibration patterns like weak or delayed feedback can hint at different problems.
- If the controller still has warranty, I only do safe checks and keep proof before trying any repair.
Interactive Trigger Pressure Tester Live Tool (How I Use It)
When I run a Controller Trigger Test, I start simple. I connect the controller and watch the gamepad triggers move on the screen. The tool reads trigger pressure from L2, R2, LT, and RT and shows it on a real time meter. I always do one quick baseline run first. Just press triggers and see the values before touching calibration. That helps me compare results later.
Steps I usually follow
- Plug in the controller. USB works best for stable readings.
- Click Detect Controller so the browser finds the device.
- Press Start, then slowly press L2, R2, LT, or RT to watch pressure values.
- Use Calibrate Neutral if the trigger shows movement when untouched.
- If calibration goes wrong, click Clear Calibration and try again.
- Adjust sensitivity between 0.5 and 2.0. Default is 1.0.
- Change the sampling interval from 10 to 1000 ms. Default is 40 ms. Lower values capture smoother trigger movement but may use more CPU.
- Set a deadzone from 0 to 0.5. Default is 0.02 to remove tiny idle noise.
- Turn on keyboard simulation if you want trigger presses to act like keys.
- When done, press Stop or click Export CSV to save the trigger data.
Controls and Settings What Each Button or Slider Does
When I run a trigger test, these controls change how the tool reads trigger pressure from the gamepad triggers. Each button or slider affects how the test behaves.
- Sensitivity slider
Changes how clearly the trigger movement shows on the meter. The sensitivity slider and number box stay synced. Range 0.5 to 2.0, step 0.01. - Sampling interval
Sets how often the tool reads trigger values. Range 10 to 1000 ms, step 10 ms. If I change it, I usually restart the test. - Deadzone step
Filters tiny trigger movement when nothing is pressed. Range 0 to 0.5, step 0.005. - Keyboard simulation
Converts trigger presses into keyboard inputs for testing. - Start / Stop / Export CSV
Start or end the test, then export the trigger data. - Controller status / test state
Shows if the controller is connected and whether the test is running.
Recommended defaults: sampling interval 30 to 60 ms, sensitivity 1.0 for fair tests.
But honestly, I do not over tune these settings. They help visualization. They do not fix broken hardware.
Live Readouts Raw vs Calibrated vs Processed Values
When I press the gamepad triggers like L2, R2, LT, or RT, the tester shows a few different numbers. These help me understand the real trigger pressure and see if something looks wrong. The values show with three decimals like 0.000, and the meter fill moves at the same time.
Here is how I read them:
- Raw value
The direct signal from the trigger. No filtering yet. Small idle noise can appear here. - Calibrated value
The adjusted number after I run calibration. It removes resting offsets. - Processed value
The final value after the deadzone filter. This is what the tool mainly shows on the meter. - Meter fill
The bar that fills as trigger pressure increases from 0.000 to 1.000.
Simple example
If the raw value shows 0.018 when the trigger is untouched, calibration plus a deadzone like 0.02 will treat it as about 0.000 processed value.
One thing I always check. I compare left and right triggers to see if they move the same. If one behaves very differently, that can hint at a trigger issue.
Quick Start Run a Trigger Pressure Check in 6 Steps
I usually keep the process simple when I test trigger pressure on gamepad triggers like L2, R2, LT, and RT.
- Connect your controller
Plug it in with USB if possible. It gives more stable readings. - Click Detect Controller
The tool checks if the browser sees your device. - Press Start
Slowly press each trigger and watch the pressure values on the meter. - Run Calibrate Neutral
Keep your hands off the triggers so the tool learns the resting position. - Adjust deadzone and sensitivity
Small tweaks help remove tiny idle noise and make trigger movement clearer. - Click Export CSV
Save the trigger data if you want to review it later.
If nothing appears, press any physical button to wake the controller.
And if you want to test the whole device, I sometimes run a full Controller Test here.
How the Trigger Pressure Test Works Using the Gamepad API
I’ll explain this in a simple way. The tool reads gamepad triggers using the browser’s Gamepad API. When I press L2, R2, LT, or RT, the controller sends an analog signal. The browser reads that signal as axes or analog buttons. The value usually shows between 0.0 and 1.0. A light press might show something like 0.15, and a full press moves close to 1.0.
According to MDN’s Gamepad API documentation, browsers expose the controller state so web apps can read button and axis values in real time. The tester samples these values, then applies calibration, a deadzone, and sensitivity settings. That process helps clean small noise and makes the trigger meter easier to read.
One thing I always keep in mind. Mappings can vary. Some controllers report triggers as axes, while others use analog buttons. Different operating systems and browsers may map them a bit differently. Chromium based browsers usually behave more consistently, but it still depends on the controller model.
The official W3C Gamepad specification explains how this system works across browsers.
Typical Trigger Mapping Differences for LT and RT
I’ve noticed that trigger mapping is not always the same. Different controllers and systems report LT and RT in slightly different ways. The tool simply reads whatever signal the browser receives.
- Xbox style mapping
Many Xbox style controllers send triggers as analog buttons. They usually appear at buttons[6] for LT and buttons[7] for RT. - PS style mapping
PlayStation style controllers may report triggers through axes or buttons. The exact mapping can change depending on the OS or browser. - Generic USB controllers
These can be inconsistent. Some show triggers as axes, others as buttons, and the index order may vary.
How I identify mine
I press one trigger at a time and watch which value moves. Quick sanity check. If pressing LT changes the right side readout, the mapping is likely swapped. I confirm that before exporting any logs.
Full Step by Step Testing Procedure for Accurate Trigger Diagnosis
Step 1 Prepare Your Controller
I start by placing the controller on a stable surface or holding it in a natural grip. That keeps my presses consistent during the test. If I use wireless controllers, I make sure they are fully charged first. Low battery can cause strange readings. I also close any mapping utilities or remapping apps. Before testing, I usually note the controller model and connection type.
Step 2 Detect the Controller
Next I click Detect Controller so the browser can find the device. Once detected, the controller name should appear and the trigger meters become active. If nothing shows, I press any button to wake it.
If detection still fails, I reconnect the controller or try another USB port to refresh the device connection.
Step 3 Baseline and Calibrate Neutral
Before pressing the triggers, I run a quick baseline check. I keep my hands off the triggers and click Calibrate Neutral. This calibration records the resting values and removes any resting offset from the triggers.
If my grip changes or I move the controller, I repeat calibration again. Small position changes can slightly affect readings. Sometimes I also Export CSV for a short resting test. That gives me a simple record of the baseline behavior.
Step 4 Sampling and Live Inspection
Now I press Start to begin sampling. Then I perform slow sweep movements from 0% to 100% and back to 0%. While doing this, I watch the meter and values carefully.
Healthy triggers usually show steady movement. The numbers rise smoothly and fall smoothly. That indicates good smoothness and linearity.
Quick checklist I follow:
- Do slow sweeps and watch for smooth value changes
- Check symmetry between press and release paths
- Compare left and right triggers with identical sweeps
- Run one fast sweep to reveal hidden issues
- Look for gaps or jumps that could indicate hysteresis
Step 5 Configure Deadzone and Sensitivity
If I see small idle movement, I adjust the deadzone. This setting removes tiny noise when the trigger rests. The deadzone range is 0 to 0.5, and I usually start around 0.01 to 0.03.
The sensitivity scale changes how clearly the movement appears on the meter. Its range is 0.5 to 2.0.
When I change settings:
- Increase deadzone if idle noise appears
- Adjust sensitivity to improve trigger movement visibility
- Avoid very large deadzones
If I ever need a deadzone above about 0.20 to hide noise, that usually suggests hardware wear. At that point I start thinking about repair or replacement.
Step 6 Export Data and Analyze
Once testing is finished, I click Export CSV to save the trigger data. The file includes columns:
timestamp,left_raw,right_raw,left_processed,right_processed
The timestamp helps track when each reading occurred.
When I review the file, I usually check:
- Maximum and minimum trigger travel
- Small signal fluctuations or jitter
- Differences between press and release that show hysteresis
- Variation in readings using standard deviation
One trick I like. I plot processed values vs time and overlay rising and falling sweeps. If the lines separate, the trigger likely has measurable hysteresis. That makes the problem much easier to see.
Quantitative Thresholds Turning Trigger Feel Into Measurable Numbers
Sometimes a trigger just feels off. But I prefer turning that feeling into numbers. The Controller Trigger Test data helps measure rest offset, jitter, deadzone, and hysteresis so I can see what is really happening. These numbers are diagnostic heuristics, not official manufacturer specs. Still, they help a lot when comparing controllers.
Simple Measurement Protocol
- Connect the controller with USB and start sampling.
- Leave the triggers untouched and record 5 seconds at rest.
- Click Export CSV and save that baseline data.
- Perform 3 slow sweeps from 0% to 100% and back.
- Run 1 fast sweep to reveal hidden instability.
- Export another CSV and compare results.
Rule of Thumb Thresholds
| Metric | What I Look For | Possible Meaning |
| Rest offset | Value above 0.1 | Trigger may not return fully |
| Jitter | High standard deviation at rest | Sensor noise or wear |
| Deadzone need | Around deadzone 0.20 or higher | Often suggests replacement |
| Hysteresis | Press and release curves differ | Internal friction or wear |
Quick Calculation Example
To measure jitter, I calculate standard deviation from the raw values.
Excel example
=STDEV(A2:A200)
Python example
import numpy as np; np.std(data)
If the numbers stay low and sweeps look smooth, the trigger is probably healthy. If offsets, jitter, or hysteresis grow large, that usually confirms the trigger problem is real.
Interpreting Results Healthy vs Warning Signs
When I check gamepad triggers, I try to separate a healthy trigger from one that shows problems. The numbers and meter patterns usually make the answer clear.
Healthy Trigger Signs
A good trigger behaves in a very predictable way.
- Monotonic movement
The value rises smoothly when I press the trigger. No sudden jumps. - Full travel near 1.00
A full press usually reaches close to 1.00 on the meter. - Low jitter at rest
When the trigger is untouched, the numbers stay near zero with almost no jitter. - Minimal hysteresis
The press and release paths look almost the same.
Quick check I use: hold the trigger steady for 2 to 5 seconds, export the data, and review standard deviation in the CSV. Low variation usually means the trigger is healthy.
Warning Signs to Watch
These patterns usually mean something is wrong with the trigger.
- Offset at rest
If the trigger shows offset at rest and values stay above 0.1, the trigger may not fully reset.
Action: run calibration again and test once more. - Visible jitter or drift
If numbers move around while untouched, that suggests jitter or sensor drift.
Action: try testing with USB and close background mapping tools. - Large dead zone required
If the trigger only behaves after a dead zone above about 0.20, wear is likely.
Action: consider repair or replacement. - Strong hysteresis
If press and release paths differ a lot, internal friction may exist.
Action: repeat sweeps and compare both triggers.
Before assuming hardware failure, I always test on another device or browser. That quick check helps confirm whether the issue comes from the controller or the system.
Troubleshooting Platform and Browser Tips Plus a Cross Device Isolation Protocol
Sometimes trigger problems come from the system, not the controller. I usually check the platform, browser, and connection first. The Gamepad API works best in certain environments, and small setup changes can affect trigger readings.
Windows and macOS
I normally start with wired USB because it gives stable input signals. Browsers like Chrome/Edge usually handle Gamepad API input more consistently. I also check for updated drivers and controller firmware. Vendor software can change button mapping too, so I temporarily disable mapping utilities before testing.
If the controller is an Xbox model, Microsoft support pages explain firmware updates and diagnostic steps:
Android
On Android devices I often need USB OTG to connect a controller directly. Wireless testing can work, but USB tends to provide cleaner input signals for trigger tests. Some Android browsers also handle controller detection differently, so trying Chrome often helps.
Linux
On Linux systems, controller input depends on kernel drivers and sometimes udev rules. When I want to verify raw input behavior, I check it with tools like jstest-gtk or SDL based utilities.
The jstest-gtk tool shows joystick axis values directly, which helps confirm whether the trigger signal is stable.
The SDL project also provides cross platform controller input support used in many games and testing tools.
Cross Device Isolation Protocol
When I want to figure out if the problem is hardware or software, I run a simple repeatable check.
- Test the controller in the web trigger tester using Chrome/Edge with wired USB.
- Test the same controller in a native input tool such as jstest-gtk or an SDL based tester.
- Connect the controller to a second computer or device and repeat the test.
What the Results Usually Mean
| Test Outcome | Likely Cause |
| Web tool wrong, native tool normal | Browser or software issue |
| Both tools show the same problem | Possible hardware issue |
| Works on second device | Driver or OS configuration issue |
| Fails on every device | Controller hardware fault |
This small protocol helps me avoid guessing. It separates system problems from real trigger hardware failures pretty quickly.
Diagnosing by Vibration Patterns What Different Impulse Trigger Behaviors Mean
Sometimes the trigger pressure sensor works fine, but the impulse trigger patterns feel wrong. I have seen cases where the trigger value looks normal in the tester, yet the vibration or haptics behave strangely. That usually points to the actuator vs firmware side of the controller instead of the sensor.
I usually follow a simple flow when I see odd trigger vibration behavior. First I observe the pattern. Then I test the controller in the official Microsoft controller tool or Accessories app. After that I try a wired USB connection, switch ports, and check for firmware updates. If the pattern still appears, I test the controller on another device to confirm whether the problem is hardware or software.
Common Impulse Trigger Patterns
| Behavior | Probable Cause | Quick Confirm Test |
| No trigger vibration | Disabled haptics, driver issue, or actuator fault | Test vibration in the Microsoft Accessories app |
| Weak vibration | Power or firmware issue affecting the actuator | Try wired USB and compare strength |
| Intermittent trigger vibration | Loose connection or firmware instability | Reconnect controller and retest |
| Delayed haptics | Software buffering or driver delay | Test on another browser or system |
| Left vs right trigger fault | One actuator failing or mapping mismatch | Compare both triggers under the same test |
One quick trick I use. I compare left vs right trigger fault patterns under identical presses. If only one side behaves oddly, that usually suggests an actuator issue rather than a sensor problem.
Practical Repair and Cleaning Tips Safe First Steps Before Opening the Controller
Sometimes trigger issues come from dust or small debris inside the trigger area. I always try safe cleaning steps before thinking about repairs. The goal is simple. Remove easy problems first, then verify the results with the tester.
I also follow a simple before and after check. I export a before/after CSV from the tester, clean the controller, then run the exact same sweeps again. If the numbers improve, the cleaning helped.
Quick Safe Steps Before Repair
These are the first things I try.
- Power off the controller completely.
- Remove batteries or unplug the USB cable.
- Use compressed air to blow dust from the trigger gap.
- Wipe the outside with a dry microfiber cloth.
- Avoid spraying liquids directly inside the trigger area.
These steps are safe and usually do not affect the warranty.
Contact Cleaner Advanced and Risky Option
Some people try contact cleaner to remove internal debris. It can sometimes help if dirt affects the trigger sensor. But honestly, this method carries risks. Contact cleaner may remove lubrication inside the trigger mechanism or damage certain plastics. It can also void the warranty on many controllers.
Because of that, I only consider it if the controller is already out of warranty and I feel comfortable doing careful maintenance.
Replacing Trigger Modules Repair Options
If cleaning does not help, the problem may be inside the trigger module itself. In some controllers it is possible to replace trigger module components, but the process often involves micro-soldering. That kind of repair requires steady hands and proper tools.
If I am unsure, I usually recommend professional repair instead of attempting the replacement myself. Sometimes the repair cost is close to the price of a new controller, so it helps to compare both options first.
Warranty Safe DIY Checks and What Actually Voids an Xbox Controller Warranty
Before I try any safe DIY controller repair, I always think about the Xbox controller warranty first. Some simple checks are safe and will not affect support coverage. But opening the controller or using risky cleaning methods can void warranty protection. If the controller is still covered, I usually stop at safe checks and collect evidence before contacting support.
Safe Checks That Usually Do Not Void Warranty
These steps are non invasive and safe for basic troubleshooting.
- Test the controller on another device to confirm the issue
- Use the web trigger tester and export logs for proof
- Update controller firmware through the Xbox Accessories app
- Reconnect with wired USB to rule out wireless problems
- Clean the exterior with a dry cloth or compressed air
These steps help diagnose problems without adding self repair risks.
Actions That May Void Warranty
These actions can affect warranty coverage.
- Opening the controller housing
- Using liquid cleaners inside the controller
- Attempting micro soldering repairs
- Replacing internal components without authorized service
- Modifying firmware or installing unofficial hardware mods
Once the controller is opened or modified, support may refuse warranty service.
RMA vs Repair Decision Checklist
When deciding RMA vs repair, I usually ask myself a few questions.
- Is the controller still under Xbox controller warranty
- Does the issue appear on multiple devices and browsers
- Are the symptoms severe or only occasional
- Does the repair cost make sense compared to replacement
If the controller is still under warranty and the problem is repeatable, I usually choose RMA instead of DIY repair.
How to Capture Reliable Proof Video Audio and Logs for Support or RMA
When I contact support, I try to show clear evidence for RMA. Good proof saves time and helps support teams understand the issue quickly. I usually record a short support video, export logs, and document the controller details before submitting a request.
Steps I Follow to Capture Evidence
- Prepare the setup
Place the controller in a well lit area so the buttons and triggers are easy to see. I keep the camera close to show trigger movement clearly. - Show the controller details
Record the controller model and serial number documentation on camera before starting the test. - Record the test in action
I open the trigger tester or the Microsoft Accessories test screen and press the triggers slowly. The video shows both the trigger movement and the live meter values. - Capture vibration behavior
If the issue involves haptics, I record controller vibration with the phone microphone close to the controller. - Export logs
I save the CSV data and any Xbox Accessories logs generated during testing. - Include system information
I write down the device used for testing, including console or PC, operating system, and app or browser version.
Quick Evidence Checklist
- Clear support video showing the problem
- Close up view of the triggers and the test tool
- Controller serial number documentation
- Exported CSV trigger logs
- System details such as console or PC, OS version, and test app used
Recording tips I use:
- Record at 60fps if possible
- Capture both a wide shot and a close up
- For intermittent issues, record short timestamped clips
Support Request Template
You can copy this format when contacting support.
Problem Summary:
Controller trigger shows abnormal behavior during testing.
Steps Already Tried:
Tested with wired USB
Updated firmware
Ran trigger tester and exported CSV logs
Tested on another device
System Information:
Controller model:
Serial number:
Device tested on (PC or console):
Operating system:
Browser or test app version:
Attachments:
Support video
CSV trigger log files
Screenshots of test results
This kind of organized report usually makes the support process much faster.
Accessibility and Alternate Input Options Including Keyboard Simulation
I always like when testing tools support accessibility. Not everyone can comfortably press analog triggers. Some people prefer to remap controls or use alternate input methods. That is where keyboard simulation becomes useful. It lets me test trigger behavior without physically pressing the controller triggers.
Keyboard Simulation Mode
With keyboard simulation, I can change trigger values using simple key presses.
- Q / E control the left trigger
- U / O control the right trigger
- Each key press changes the trigger value by increment 0.1
This means I can slowly step the trigger value up or down without touching the controller.
Simple checklist I follow
- Enable keyboard simulation in the tester
- Press the keys to step trigger values up or down
- Confirm how the app reacts to thresholds or deadzone settings
Example use case
Sometimes players with limited finger movement map trigger actions to a stepped input or toggle. Using simulation helps check if the game or app responds correctly. And if I want to test other controller inputs too, I sometimes run a quick D-Pad Test here.
Developer Notes Using Trigger Pressure in Games
When I design input logic for games, I treat analog triggers as continuous controls rather than simple buttons. That makes actions like acceleration, braking, or aiming feel smoother. The browser Gamepad API usually reports trigger values between 0 and 1, or through axes that need normalization. The W3C Gamepad specification explains the expected input structure and value ranges.
Here are a few practices I usually follow during development and QA.
- Map analog triggers to gradual actions instead of binary input.
- Let players configure deadzone values to remove idle noise.
- Add sensitivity scaling so players can tune trigger response.
- Support fallback digital triggers if the controller only reports on/off signals.
- Log unusual mapping results during QA to detect controller differences.
Common trigger mappings often appear at buttons[6] and buttons[7], but some controllers expose them through axes such as axes[2] or axes[5].
Example Detection Logic
if buttons[6] or buttons[7] exist:
left_trigger = buttons[6].value
right_trigger = buttons[7].value
else:
try axis pairs [2,5], [3,4], [2,3], [4,5]
normalized = (axis + 1) / 2
choose axis with largest variance during press
That small heuristic helps detect trigger movement across different controllers. I also like storing per controller calibration profiles in game settings so trigger behavior stays consistent between sessions.
Conclusion What I Do Next After Seeing the Results
After running the trigger test, I usually look at the numbers and decide the next step. Small issues like minor jitter or a tiny offset can often be fixed with calibrate and a small deadzone adjustment. But if the behavior repeats during a cross-device test, the trigger hardware may be wearing out. I also keep every Export CSV file so I can compare before and after results whenever I change firmware, clean the controller, or replace parts.
FAQs
Why do my triggers show small resting values even when untouched?
I see this a lot. Small resting values usually happen because of tiny sensor offsets. Running calibration with Calibrate Neutral often fixes it. If a tiny value still appears, I add a small dead zone to filter it out.
My trigger does not reach near 1.000. Does that mean it is broken?
Not always. I first test the controller on another browser or device to rule out mapping differences. If the trigger still stops well below full range, the cause may be mechanical wear or a limited trigger travel design.
What is the difference between calibration fixing offset and true trigger drift?
Calibration helps remove a steady offset at rest. But it cannot fix random movement. If values keep changing while the trigger is untouched, that is drift or jitter, which usually comes from sensor noise or hardware wear.
Why do LT and RT appear as different axes or buttons on different systems?
Controller mapping depends on the device, operating system, and browser. Some controllers report triggers through buttons[6] and buttons[7], while others expose them through axes. The Gamepad API simply reads what the system provides, which is why the index can vary.
How can I tell if the issue is hardware or software?
I usually run a cross-device test. First I test in the browser tool. Then I check with a native tool like Xbox Accessories or jstest-gtk. If the same problem appears everywhere, the issue is likely hardware.
What should I send to support for an RMA request?
I usually send clear evidence for RMA. That includes a well lit video showing the issue, the controller serial number, and screenshots from the Microsoft test app. I also attach the exported CSV file and system details like firmware, OS, and browser version.
My impulse trigger vibration is weak or delayed. Are my analog triggers failing?
Not necessarily. Impulse trigger patterns come from vibration actuators, not the analog trigger sensor. Weak vibration, delayed haptics, or intermittent trigger vibration usually point to actuator, firmware, or connection issues instead of the pressure sensor.
What data appears in the CSV export and what should I check first?
The export includes these columns:
timestamp,left_raw,right_raw,left_processed,right_processed
I normally check three things first. Maximum and minimum trigger values, standard deviation at rest to detect jitter, and differences between press and release sweeps that may show hysteresis. If resting offset goes above 0.1, that is considered large. If a dead zone above about 0.20 is needed to hide noise, repair or replacement may be worth considering.