
Deadzone Test
Test and tune controller deadzone settings online. See when analog stick movement is inside or outside your selected deadzone threshold.
Connection Status
Connect a controller, release both sticks, and adjust the deadzone slider to tune sensitivity.
Controller Info & Deadzone Settings
Lower deadzone = more sensitivity. Higher deadzone = more filtering for small stick movement/drift.
Deadzone Tuning Advice
Tip: For tuning idle drift, release the sticks completely. For gameplay feel, move the stick slowly and find the point where input starts.
Deadzone Input Test
“Processed Output” shows a simple radial deadzone result: 0 inside deadzone, then scaled from 0 to 1 outside the deadzone.
I see this problem a lot with controllers. The stick moves on screen even when no one touches it. That small movement is called drift. And yeah, it can mess up aim or movement in games.
A deadzone fixes this. It blocks tiny joystick movement near the center. So small drift or noise does not send input to the game.
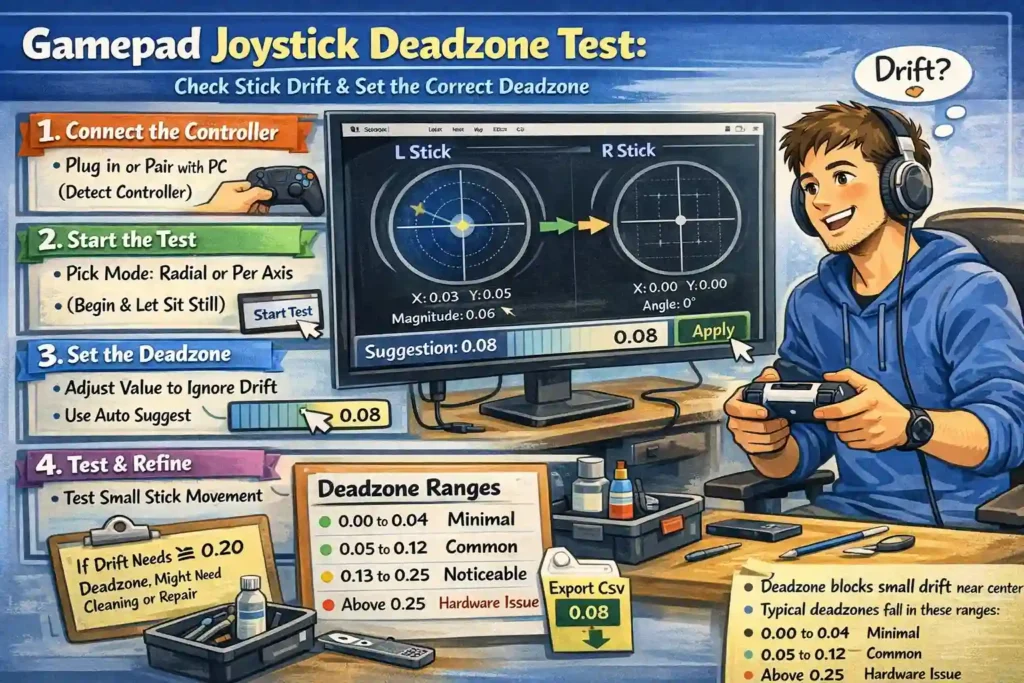
When I run a deadzone test, I watch how the joystick behaves while it sits still. The tool shows values like X, Y, magnitude, and angle in real time. That helps me see if the controller sends random signals.
Key Takeaways
- Deadzone creates a small safe area around the joystick center. Tiny drift stays ignored.
- A browser deadzone test shows joystick X and Y movement, magnitude, and angle live.
- Radial deadzones apply evenly in all directions. Per axis deadzones help when only X or Y shows noise.
- I usually let the controller sit still for 30 to 60 seconds before checking results.
- The tool then uses that idle data to suggest a safe starting deadzone.
- Typical deadzone values fall in these ranges:
- 0.00 to 0.04 minimal movement
- 0.05 to 0.12 common for many controllers
- 0.13 to 0.25 noticeable but usable
- Above 0.25 often signals a hardware problem
- Exporting a CSV log helps check jitter, spikes, or constant offset more clearly.
- If you need around 0.20 or more just to stop drift, the joystick may need repair or replacement.
What This Deadzone Test Actually Does (and When I Use It)
I use this deadzone test when a joystick starts acting weird. Like the camera moves by itself. Or the character slowly walks forward. That usually means stick drift or small noise from the controller.
This test measures how the joystick behaves while it sits still. It shows the tiny signals the controller sends even when I’m not touching it. Once I see that idle movement, I can choose a deadzone that blocks drift but keeps good sensitivity and precision.
The tool works with most controllers. Xbox, PlayStation, Nintendo, and PC gamepads. And the test runs locally in the browser, so no controller data gets uploaded.
Quick Start: How I Run the Deadzone Test in the Browser
- Connect and wake the controller
I plug the controller into the PC or connect it with Bluetooth. Then I press any button so the system wakes it up. - Detect the controller
I click detect controller on the page. If the tool shows “None”, I press any button on the controller again. That usually triggers browser detection. - Start the test and choose a mode
I press start test and pick a deadzone mode. Either radial or per axis. Radial checks movement in all directions. Per axis checks X and Y separately. - Let the joystick sit still
I leave the joystick untouched for a short time. The tool collects idle movement data and runs auto suggest to estimate a safe deadzone. - Apply the value or export data
If the suggestion looks good, I apply the deadzone. If I want deeper checks, I export CSV and review the numbers. For broader stick diagnostics, I sometimes run an Analog Stick Test too.
Controls and Interface Overview: What Each Button and Setting Does
When I first open the deadzone tool, I see a few buttons and sliders. Each one controls how the joystick data gets measured. Some settings start the test, while others adjust deadzone, sensitivity, or how often the controller gets sampled.
And one small thing many people miss. The slider and number box stay synced. So if I share my settings with someone or include them in a bug report, they can repeat the same test exactly.
According to MDN Web Docs, browsers sometimes need a small user action like pressing a button before the Gamepad API exposes a controller. So if the tool does not detect a device right away, I usually press any controller button once.
Here is what the main controls do.
- Detect Controller
This button checks if the browser can see the controller. If detection fails, pressing any controller button usually fixes it. - Start Test / Stop Test
Start begins the joystick measurement. Stop pauses it. I usually stop the test when I want to review values or change settings. - Calibrate
This option helps calibrate the stick center. It resets the neutral point so small offsets do not affect the test. - Deadzone Value
The tool lets me set a deadzone between 0 and 0.5. Lower values keep better precision. Higher values block more drift. - Deadzone Mode: Radial or Per Axis
Radial applies one circular deadzone for all directions. Per axis sets separate limits for X and Y movement. - Sensitivity Setting
Sensitivity adjusts how responsive the stick feels. The usual range goes from 0.5 to 2.0. - Sampling Interval
This controls how often the tool reads joystick data. The default is 40 ms, but it can run anywhere between 10 ms and 1000 ms. - Export CSV
This button lets me export CSV data from the test. The file includes timestamps and joystick values. - Keyboard Simulation
Some tools let the joystick trigger keyboard keys. This keyboard simulation helps test controller input in simple apps. - Clear Data / Reset
This clears previous readings so I can start a fresh test without old data affecting the results.
Live Readouts and Visual Feedback: How I See Drift and Deadzone
When I run the test, the tool shows two small canvas areas. One for the left stick and one for the right stick. A dot moves inside the canvas when the joystick moves. If the stick is resting but the dot still moves, that usually means drift or signal noise.
The screen also shows values like X, Y, magnitude, and angle. These numbers help me see how far the stick moves from the center and in which direction. A deadzone overlay then shows which movement gets ignored and which movement becomes active input.
What the readouts mean
- Stick Canvas (Left / Right)
The dot shows real time position of the left stick or right stick. - Deadzone Overlay
A circle or bars show the deadzone area. Movement inside it gets ignored. - Radial Mode
The overlay appears as a circle. Small movement inside the circle stays ignored. - Per Axis Mode
Separate horizontal and vertical limits appear. This helps when X or Y has more jitter. - Magnitude
This number shows how far the stick moves from the center. - Angle
This shows the direction of the stick movement. The value usually comes from a function called atan2(y, x).
Complete Guide: Understanding Deadzones, Picking Values, and Fixing Drift
If you just want a quick deadzone value, you can jump straight to the section about choosing deadzones. But if your controller has drift or weird stick behavior, this guide walks through the full process. I explain what deadzones do, how calibration differs, how the tool works, and what to try if problems keep showing up.
What a Deadzone Is (and How It Differs From Calibration)
A deadzone is a small area around the center of a joystick where tiny movement gets ignored. Controllers often send tiny signals even when the stick rests. That happens because of things like potentiometer wear, hall effect sensors, small hardware tolerances, temperature changes, or simple electronic noise.
So the game may think the stick moved even when nobody touched it. That is what people call stick drift.
A deadzone fixes this by blocking tiny signals near the center. The game only reacts once the stick moves past that safe area.
Calibration works differently.
Calibration re centers the joystick so the neutral position becomes accurate again. A deadzone simply ignores small movement instead of moving the center point.
If the stick feels off center, I usually check calibration first with a Stick Calibration Test.
Radial vs Per Axis Deadzones: Pros, Cons, and When I Use Them
Different deadzone styles change how joystick movement gets filtered.
Radial Deadzone
- Uses the vector magnitude of the stick movement.
- The deadzone forms a circle around the center.
- Movement becomes active only after leaving that circle.
- This keeps directional sensitivity the same in every direction.
Per Axis Deadzone
- Applies separate limits to the X axis and Y axis.
- Useful when only one axis shows jitter or noise.
- Often used when vertical or horizontal drift appears stronger.
Quick diagnostic hint
If idle stick points form a circle pattern, radial usually works well.
If the points stretch into an ellipse pattern, per axis filtering often helps more.
How This Tool Works (Gamepad API, Axis Range, Sampling)
This deadzone tool reads controller input using the browser Gamepad API. The joystick sends axis values that usually range from −1.0 to +1.0. Zero means the stick sits near the center. Larger values mean stronger movement away from the center.
The tool samples those axis values repeatedly using a sampling interval. Each sample records stick position, magnitude, and direction. When the stick stays still, those samples show how much idle noise the controller produces.
According to the W3C Gamepad specification, browsers expose controller input through standardized APIs. Some browsers require a small user action, like pressing a button, before the controller becomes visible to the page.
The Auto Suggest feature studies idle samples from the stick. It finds the worst observed noise and suggests a safe starting deadzone based on that data.
Step by Step Testing Process (Repeatable Method)
I usually follow the same method every time I test a controller.
- Connect the controller
Plug it in with USB or connect with Bluetooth. - Detect the controller
Click detect and press any button if the browser does not see it. - Choose the deadzone mode
Pick radial or per axis depending on the noise pattern. - Collect idle data
Let the joystick sit completely still for 30 to 60 seconds. - Run Auto Suggest
The tool calculates a safe starting deadzone using the idle samples. - Apply the new value
Test small stick movement to see if drift disappears. - Export data if needed
Use export CSV if you want deeper analysis like histograms or spike checks.
Sometimes I run two tests. One when the controller is cold, and another after a short play session. Temperature and wear can slightly change stick behavior. If drift still appears, I usually confirm it with a Stick Drift Test.
Auto Suggest Algorithm: What It Does (and Its Limits)
The Auto Suggest feature estimates a safe deadzone using idle stick data. It checks the largest noise signal the joystick produces while resting.
The tool then adds a small safety margin so tiny spikes do not trigger movement.
Main rules the tool follows:
- Uses the maximum magnitude from idle samples.
- Adds a 1.15 multiplier as a safety margin.
- Caps the result at 0.45 to prevent extreme values.
- In per axis mode, it checks the largest absolute value for X and Y.
This approach gives a safe starting value. But it is not perfect.
Short idle samples may miss rare spikes. That is why I sometimes repeat the test two or three times before trusting the suggestion.
Interpreting the Readouts (X, Y, Magnitude, Angle)
The tool shows several numbers during the test. Each one explains a different part of the joystick movement.
X and Y values
- Show horizontal and vertical stick movement.
- Small numbers near zero usually mean the stick rests correctly.
Magnitude
- Shows total distance from the center.
- Calculated using the formula sqrt(x² + y²).
Angle
- Shows the direction of stick movement in degrees.
Example:
If X = 0.6 and Y = 0.8, then the magnitude becomes about 1.0.
For radial deadzones, the magnitude matters most.
For per axis deadzones, the X and Y values matter more.
Choosing a Deadzone: Practical Ranges and Advice
Deadzone values usually fall into a few common ranges. Each range changes how responsive the controller feels.
- 0.00 to 0.04
Very small deadzone. Best for competitive aiming where precision matters. - 0.05 to 0.12
A common range for many controllers. Removes small noise without hurting movement. - 0.13 to 0.25
Drift becomes noticeable. Games still work, but precision drops. - Above 0.25
Often signals a hardware issue with the joystick.
Competitive FPS players usually prefer lower values for better aim control. Casual racing or driving games can tolerate slightly larger deadzones because movement stays smoother.
The goal is simple.
Block drift. Keep control responsive. And avoid raising the deadzone more than needed.
Accurate Dynamic Measurement: Using Oscilloscope or ADC Sampling to Detect Micro Jitter
Sometimes a joystick looks stable with a simple multimeter. But that tool only shows slow voltage changes. Tiny movement from the stick can still exist. That small signal jitter often causes drift in games.
For proper dynamic deadzone detection, I use tools that measure signals many times per second. High sampling rate readings reveal tiny stick noise that basic tools miss.
Below are two common ways to measure joystick movement more accurately.
1. Oscilloscope Method (Oscilloscope Joystick Measurement)
I connect the joystick output signal to an oscilloscope and monitor the voltage while the stick rests.
Steps I usually follow:
- Connect the joystick axis signal line to the oscilloscope probe.
- Set the oscilloscope to capture small voltage fluctuations around the center signal.
- Use a sampling rate above 200 Hz to observe human input changes.
- Increase capture speed to around 1 kHz or higher when checking micro jitter.
- Watch how the signal line moves while the stick stays untouched.
If the signal constantly moves a little around the center, that shows the real noise floor of the joystick.
2. Microcontroller ADC Method (ADC Sampling Joystick)
Another method uses a small microcontroller like Arduino or a Raspberry Pi Pico. The board reads joystick voltage using ADC sampling joystick input.
Most microcontrollers use 10 to 12 bit ADC resolution, which gives readings like:
- 0 to 1023 for 10 bit ADC
- 0 to 4095 for 12 bit ADC
According to Arduino and Raspberry Pi Pico documentation, ADC resolution and sampling speed depend on the board hardware and configuration.
A very simple data logging idea looks like this:
loop:
read ADC value
record timestamp
store value in log
After logging many samples, I calculate:
- Mean value
- Standard deviation
- Minimum and maximum readings
Those numbers show how much the signal moves while idle.
What the Results Usually Look Like
- A stable joystick shows only small value changes near the center.
- Larger random spikes suggest signal jitter or worn sensors.
- The difference between min and max readings helps estimate the required deadzone.
- Converting ADC counts to percent gives a clearer deadzone value.
Example formula idea:
deadzone % = (noise_range / full_scale_range) × 100
So if a joystick fluctuates about 20 counts in a 1023 range, the noise equals roughly 2%.
One quick caution. Opening a controller or tapping joystick signals may void warranties or damage hardware if done incorrectly.
How I Quantify Deadzone Using Simple Metrics and Benchmarks
When I check a joystick, I try not to guess. I measure it. A clear deadzone measurement helps compare controllers, firmware, or settings without relying on feel.
The idea is simple. Measure how much the joystick signal moves while it sits still. Then convert that movement into ADC counts or a percentage deadzone.
Simple Testing Protocol I Follow
- Connect the controller
Plug it in or connect wirelessly. Make sure the joystick is centered. - Let the controller warm up
I usually wait a minute. Temperature changes can slightly shift readings. - Start data sampling
Record joystick values continuously for a short period. - Leave the stick untouched
I normally collect idle data for about 30 to 60 seconds. - Record the value range
Note the smallest and largest readings during that idle period. - Calculate the noise range
Subtract the minimum reading from the maximum reading. - Convert that range into a percentage deadzone
The simple formula looks like this:
deadzone % = (deadzone_counts / full_scale_counts) × 100 - Compare the result with common joystick benchmarks
This method makes results repeatable. If two controllers show the same percentage range, they behave almost the same.

What the Metrics Mean
- ADC counts
The raw numeric values coming from the joystick sensor. - Deadzone counts
The range between the highest and lowest idle values. - Percentage deadzone
The noise range compared with the full signal scale. - Joystick benchmark
A rough guideline showing whether the stick behaves well or poorly.
Typical Deadzone Benchmark Ranges
| Percentage Deadzone | Meaning |
| Below 1–2% | Very stable joystick |
| 2–5% | Acceptable for most controllers |
| Above 5% | Noticeable drift or sensor wear |
Small Example
Let’s say the joystick uses a 10 bit ADC, which means the full range is 0–1023.
If idle readings move between 505 and 525, the noise range equals:
20 counts
Now convert it:
deadzone % = (20 / 1023) × 100 ≈ 1.95%
That means the joystick has about a 2% deadzone requirement, which usually falls in the acceptable range.
How I Keep Results Consistent
To make the measurement reliable, I try to keep conditions the same every time.
- Let the controller warm up before testing
- Use the same sampling window each time
- Avoid touching the stick during idle measurement
- Use the same connection mode, wired or Bluetooth
When the method stays consistent, the numbers actually mean something. And that makes choosing the right deadzone much easier.
Export and Analysis: What I Check in the CSV Data
Sometimes the live graph looks fine, but I still want real numbers. That is when I export CSV data from the test. The file usually contains a timestamp and joystick values for each sample. I open the file in Excel or Google Sheets and look for patterns in the numbers.
According to Microsoft Excel and Google Sheets documentation, spreadsheets can easily calculate basic statistics and build simple histograms for time series data. That makes it easier to spot joystick drift or noisy sensors.
Here are the checks I normally run:
- Check the maximum and minimum values
The max and min readings show the full idle movement range. - Calculate the mean value
The mean helps reveal if the joystick stays centered or drifts slightly. - Look at the standard deviation
A high standard deviation usually means unstable signals. - Scan for outliers
Large spikes in the data often appear as outliers. - Create a histogram
A histogram shows how often values cluster near the center. - Check for persistent offsets
If values stay shifted in one direction, the stick may have bias.
Quick spreadsheet trick. I sometimes calculate magnitude from X and Y columns to estimate a safe radial deadzone.
Common Pitfalls: Why the Deadzone Sometimes Feels Wrong
I’ve seen this happen many times. Someone sets a deadzone, but the controller still feels strange. Most of the time the issue comes from small setup mistakes, not the joystick itself.
Here are the problems I usually check first.
- Deadzone set too high → movement feels slow
A large deadzone blocks drift, but it also kills fine control. Lower it slowly until movement feels responsive again. - Game settings override the test value → controls feel different
Some in game settings add their own deadzone. If both are active, the controller can feel sluggish. - Bluetooth noise → random stick jitter
Bluetooth connections sometimes introduce signal jitter. Testing with a wired connection usually gives cleaner results. - Controller not warmed up → readings change later
Sensors can shift slightly after a short warm up. Testing right after plugging in can give misleading results. - Idle sampling too short → spikes get missed
If the stick rests only a few seconds, noise patterns may not appear. - Changing values too quickly → hard to find the right point
I usually lower the deadzone until drift appears, then increase it in 0.01 steps until the stick becomes stable.
Troubleshooting and Quick Fixes: Fast Checks I Try First
When a controller starts drifting, I don’t jump straight to repairs. I run a few quick checks first. These steps help me figure out if the issue comes from the controller, the connection, or the system.
- Restart and reconnect the controller
I usually restart the device or reconnect the controller. Small connection glitches sometimes cause strange input behavior. - Switch to wired mode
If I’m using Bluetooth, I try a wired connection. Wireless signals can introduce small jitter. - Test in another browser
Different browsers sometimes handle controller input differently. Running the test in another browser can confirm if the problem is software related. - Adjust the deadzone slowly
I lower the value, then adjust deadzone in small steps until drift disappears but movement still feels responsive. - Test another controller
If possible, I test controllers side by side. That quickly shows whether the issue comes from the hardware. - Export a short log before deeper fixes
I usually export CSV data from the test. That gives a small record of the problem before trying repairs.
Intermediate Repairs and Cleaning: Safe Steps I Try Before Replacing a Controller
Sometimes stick drift comes from dust or debris inside the joystick module. I usually try a quick cleaning before thinking about a full repair.
Here is the safe process I follow.
- Power off the controller
I turn the controller off and disconnect it from the PC or console before doing anything. - Blow out dust with compressed air
I use short bursts of compressed air around the joystick base. This can remove dust trapped under the stick cap. - Move the stick while cleaning
I gently rotate the joystick in circles while blowing air. That helps push debris out from the edges. - Use contact cleaner if needed
If drift continues, a small amount of contact cleaner can help clean the internal sensor contacts. - Let the controller dry
After using cleaner, I wait for proper drying time before turning the controller back on. - Test the joystick again
Once dry, I run another test to see if the drift improved.
One important caution. Opening the controller or using strong solvents can damage components or void the warranty. If you are not comfortable doing this kind of repair, it is safer to let a professional repair shop handle it.
Advanced Repair: Joystick Module Replacement When Cleaning Does Not Work
Sometimes cleaning does not fix the problem. At that point, the only real fix is joystick module replacement. This means opening the controller and removing the old stick unit from the circuit board.
The process usually involves desoldering the old module and soldering a new one in place. Most controllers use either potentiometer based sticks or newer hall sensor modules.
This type of repair needs proper tools and steady hands. If the controller still has a warranty, I would check that first. Many people find it safer to use a professional repair service instead of attempting the replacement themselves.
When I Decide to Replace the Controller (Practical Thresholds)
Sometimes adjusting the deadzone only hides the problem. If I need a value above 0.20 just to stop drift, that usually points to hardware failure inside the joystick. At that point the controller still works, but the extra deadzone starts hurting precision in games.
A large deadzone is really just a workaround. The long term fix is either repair or replace controller.
I usually think about replacement when:
- Deadzone > 0.20 and gameplay feels inaccurate
- The joystick keeps drifting even after cleaning or calibration
If those problems keep showing up, repairing the joystick module or buying a new controller usually makes more sense.
Privacy and Security: How Local Processing Works
This deadzone test runs locally in your browser using the Gamepad API. The tool reads joystick input directly from the device, but it does not send that data anywhere. There is no upload happening in the background.
If you choose to export CSV, that file is created only on your device. Nothing leaves your system unless you manually share it. For better privacy, I usually avoid granting extra permissions or using unknown third party testing tools.
Accessibility: Alternate Inputs and Screen Reader Support
Not everyone uses a controller the same way. So good accessibility matters here. The tool shows clear numeric readouts for joystick values like X, Y, and magnitude. A screen reader can read those numbers even if someone cannot see the visual stick graph.
According to guidance from the W3C Web Accessibility Initiative, labeled controls and text alternatives help assistive technologies work properly with web tools.
A few features make the test easier to use.
- Numeric readouts for screen readers
The joystick data appears as numbers, so a screen reader can read the values without relying on the visual canvas. - Keyboard simulation mode
The tool can enable keyboard simulation, letting joystick movement trigger keyboard keys for testing alternate inputs. - Clear labels and high contrast design
Buttons and controls use clear labels. A high contrast interface also helps users who need stronger visual clarity. Some implementations also add ARIA labels to the canvas for better assistive support.
Bug Report and Reproduction Template: What to Collect and How to Escalate
When I report a controller problem, I try to make the issue easy to reproduce. A clear joystick deadzone bug report helps support teams understand the problem faster. Without proper details, most reports get ignored.
I usually include system info, test steps, and a few controller logs. That way developers or support teams can see exactly what happened.
Bug Report Template (Copy and Fill)
- Device model:
- Controller model:
- Firmware / BIOS version:
- Operating system and driver version:
- Connection type: Wired or Bluetooth
- Mode used: Gamepad mode or desktop mode
- Armoury Crate version:
- Steam Input: On / Off
- Test tool used: Deadzone test or stick drift test
- Observed issue: Short description of the joystick problem
Suggested tags when posting online:
- input drift
- joystick deadzone issue
- desktop mode only
These tags help others find similar reports.
Steps to Reproduce the Issue
- Connect the controller to the PC or console.
- Open the deadzone testing tool.
- Leave the joystick idle for a short sampling period.
- Watch the X and Y readouts while the stick rests.
- Notice any drift or unexpected movement.
- Repeat the test after reconnecting the controller.
If the behavior appears consistently, the issue becomes easier to confirm.
Attachments That Help Support Teams
- Controller logs or exported CSV data
- Screenshot of joystick readouts or graphs
- Short screen recording showing the problem
- Notes explaining expected vs actual behavior
For example:
- Expected: Stick remains stable at center.
- Actual: Cursor moves slowly without touching the joystick.
Providing this information improves the chance that developers or the community can reproduce the issue and suggest a fix or ASUS support escalation if needed.
Final Advice: A Simple Workflow for Reliable Deadzone Settings
When I tune a controller, I try to keep things simple. First I measure the stick noise. Then I set a deadzone that removes drift but still keeps good control. After that I retest the controller inside a real game. The goal is always the same: balance stability and precision.
Sometimes I repeat the test twice. One test when the controller is cold, and another after playing for a while. Small changes in temperature can slightly affect stick behavior.
Pro tip: If the joystick still feels strange, run a stick drift test or check calibration with a stick calibration test to see if the center point needs adjustment.
FAQs
What’s the difference between calibration (offset) and deadzone?
People mix these two up a lot. Calibration adjusts the stick center so the controller knows where neutral should be. It fixes a constant offset if the stick rests slightly off center.
A deadzone does something different. It ignores tiny movement near the center so small drift or signal noise does not trigger input.
So think of it like this. Calibration re centers the stick. Deadzone filters small movement.
Can a deadzone fix stick drift permanently?
Not really. A deadzone only hides small drift by ignoring movement near the center. It helps gameplay feel stable, but it does not repair worn sensors or hardware.
If drift keeps getting worse over time, the controller may have hardware drift. At that point cleaning, repair, or joystick replacement usually becomes the real fix.
Is Auto Suggest accurate enough for competitive games?
Most of the time Auto Suggest works well as a starting point. The tool watches idle movement and suggests a deadzone based on the worst noise it sees.
But competitive players often fine tune it further. I usually test the suggestion, then lower the value slightly until drift appears. After that I increase it just enough to stay stable.
Should I use radial or per axis deadzones for uneven jitter?
It depends on how the stick behaves. Radial deadzone uses circular filtering, so sensitivity stays even in every direction.
If the noise mainly appears on one axis, per axis deadzones can work better. That lets you adjust the X axis and Y axis separately.
A quick clue helps here. Circular idle patterns usually fit radial filtering. Stretched patterns often mean per axis settings work better.
How long should I let the stick sit idle before deciding a deadzone?
I usually let the joystick sit still for 30 to 60 seconds. That gives the tool enough time to measure idle noise and tiny movement.
Short tests can miss spikes or random jitter. Longer idle sampling gives a more reliable deadzone estimate.
Why does my controller look worse over Bluetooth than wired?
Wireless signals sometimes introduce small timing issues. That can create extra jitter or tiny input spikes.
When I run tests, I usually try a wired connection first. It removes most wireless interference and makes the results easier to trust.
Which stick should I test first, left or right?
I normally test the left stick first because many games use it for movement. But honestly, both sticks can develop drift.
The safest approach is simple. Run the same test on both sticks and compare the results. That way you can see if one joystick behaves worse than the other.