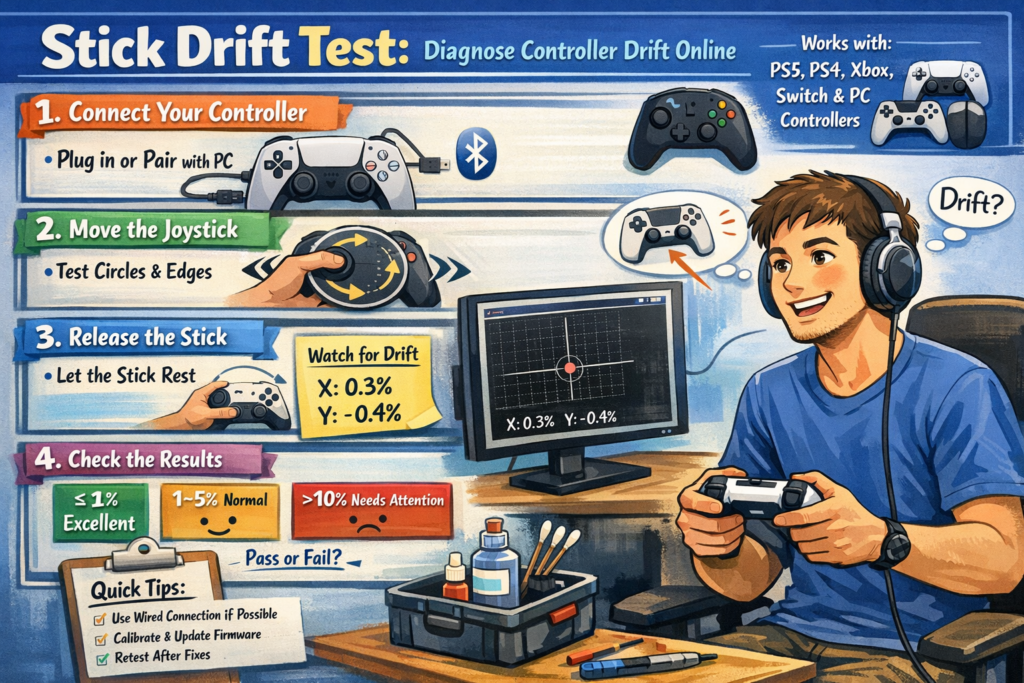
Stick Drift Test

Test analog stick drift online. Check left and right stick center offset and compare results against a deadzone threshold.
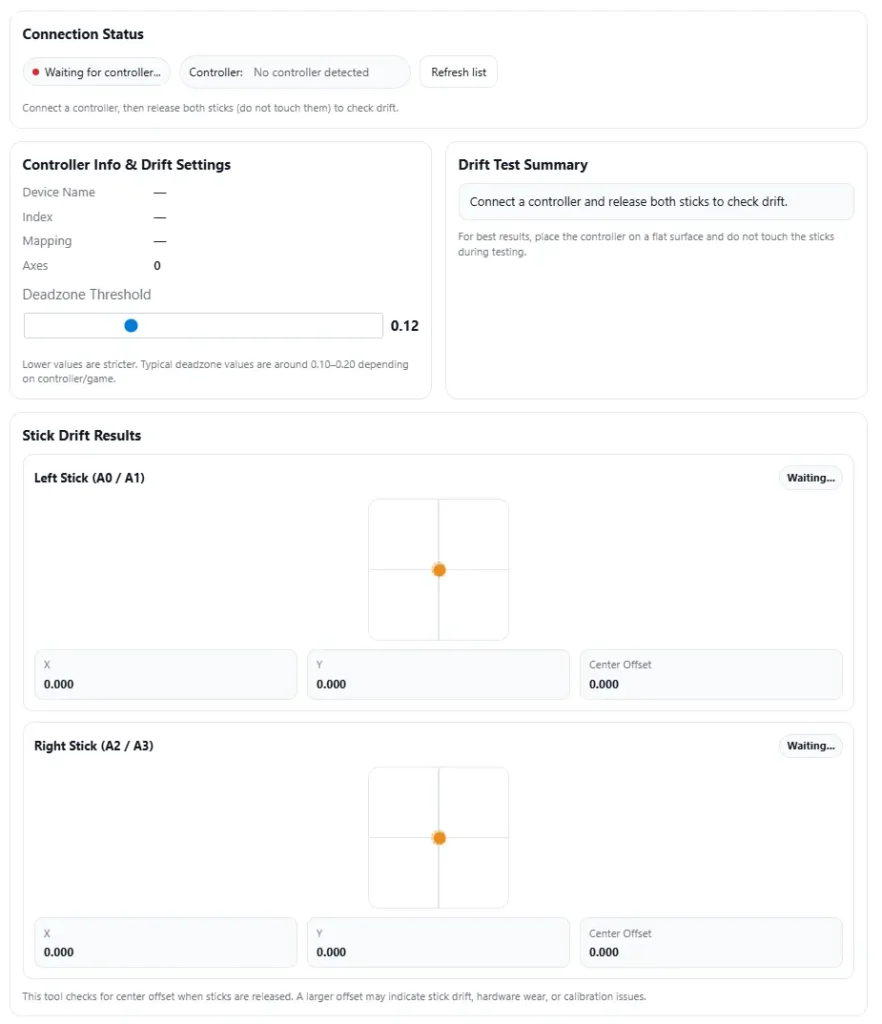
Connection Status

Waiting for controller…

Connect a controller, then release both sticks (do not touch them) to check drift.

Controller Info & Drift Settings

Device Name
Index
Mapping
Axes
0
0.12

Lower values are stricter. Typical deadzone values are around 0.10–0.20 depending on controller/game.

Drift Test Summary

Connect a controller and release both sticks to check drift.

For best results, place the controller on a flat surface and do not touch the sticks during testing.

Stick Drift Results

Left Stick (A0 / A1) Waiting…
X 0.000
Y 0.000
Center Offset 0.000
Right Stick (A2 / A3) Waiting…
X 0.000
Y 0.000
Center Offset 0.000

This tool checks for center offset when sticks are released. A larger offset may indicate stick drift, hardware wear, or calibration issues.

I use this stick drift test to check a controller joystick in the browser. It works with PS5, PS4, Xbox, Switch, and PC controllers and shows real time X/Y offsets so I can see if drift looks normal or problematic. Inputs stay in the browser. Connect your controller to start.

Key Takeaways

  • Stick drift means the joystick sends input even when I’m not touching the stick on the controller.
  • I run the online stick drift test and watch real time X/Y offsets while the stick rests.
  • Perfect (0,0) almost never happens. What matters is stable values.
  • I check tolerance bands: ≤1% excellent, 1–5% normal, >10% needs attention.
  • I test wired first because Bluetooth interference can create fake drift.
  • I try fixes in order: clean → calibrate → update firmware or drivers → retest.
  • Repair shops record before and after test logs and use clear pass or fail rules.
Stick Drift Test

Using the Stick Drift Test

I follow these steps when I run the online stick drift test.

  1. Connect the controller
    I plug in or pair my controller to the PC. The browser may ask for permissions. I allow it so the page can read joystick input.
  2. Move the joystick
    I move the stick in circles and edges. The crosshair and X/Y readout should move in real time.
  3. Release the stick
    I let go of the joystick. The crosshair should return near the center.
  4. Watch for drift
    If the X/Y values move while I am not touching the stick, that shows drift detection.

Quick tip: Wired vs Wireless

  • Charge the battery first
  • Use wired if possible
  • Move away from USB hubs or Bluetooth devices
  • Retest to confirm the result

What Stick Drift Means

Stick drift happens when a controller joystick sends idle input even when I am not touching the analogue stick. The system reads a small offset, so the game thinks the stick moved. This usually comes from sensor noise or worn parts.

Sometimes the offset stays in one direction. Other times the X/Y values jitter and jump around. That difference helps later when checking the problem.

How Drift Shows Up (Symptoms You Can Confirm)

  • Camera drift
    The camera slowly moves without touching the stick.
    Quick test: open the map or pause screen, take hands off the controller, and watch for about 30 seconds.
  • Character movement
    The character walks or turns on its own.
    Quick test: stand still in a game area and see if the character moves.
  • X/Y values twitching
    The X/Y values move even when the stick rests.
    Quick test: watch the stick test page and check if numbers keep twitching.
  • Menu drift or auto scroll
    Game menus move by themselves.
    Quick test: sit in the menu and see if it keeps scrolling.
  • Hard to keep aim centered
    The crosshair drifts off target.
    Quick test: aim at one spot and release the stick.

Common Causes of Stick Drift (Potentiometer vs Hall Effect)

I usually see stick drift come from small hardware issues inside the joystick module.

Common causes:

  • Potentiometer wear
    The joystick uses a potentiometer with a small wiper that slides on a track. Over time the track wears and the signal becomes uneven.
  • Dust or debris
    Dust or debris inside the stick can block smooth movement and create small input jumps.
  • Plastic wear or looseness
    The stick parts develop play after heavy use, which shifts the center point.
  • Flex cable aging
    Old flex cables or connectors can cause electrical noise and jitter in the signal.

Potentiometer vs Hall Effect

  • Potentiometer sticks
    Use physical contact between the wiper and track. Wear and dirt can create drift.
  • Hall effect sensors
    Use magnets and magnetic sensing. No physical contact, so they resist wear better.

According to Adafruit learning resources on potentiometers and hall effect sensors, magnetic sensing avoids the mechanical friction found in traditional potentiometers.

And if someone wants to see how sticks mount inside controllers, iFixit teardowns show the analog modules and replacement steps clearly.

One quick tip. If you want to know which stick type a controller uses, I usually check the model online or look at teardown guides before opening anything.

Reading Stick Values Near Center (What (0,0) Actually Means)

When I run a stick drift test, I look at the center point (0,0). That number means the joystick sits in the middle with no input. But real controllers almost never stay at perfect zero. Small deviation happens because of sensor noise and normal wear.

What matters more is stability. If the rest values stay close to the center and do not move much, the stick usually works fine.

I try to keep testing conditions the same:

  • Place the controller on a flat surface
  • Do not touch the joystick
  • Watch the values for a few seconds
  • Repeat the test a few times to compare the baseline

Running short repeated checks helps me see if the values stay stable or slowly drift.

Ideal ReadingReal World Reading
Stick snaps to (0,0) and stays stillSmall deviation around center
No wobble or movementTiny value changes appear
Happens mostly in lab conditionsNormal on used controllers

Next step is checking how big the deviation is and whether it falls inside normal tolerance.

Ideal Center (What Perfect Zero Looks Like)

The ideal center means the stick returns exactly to (0,0) with no wobble at all. That usually happens in lab conditions or brand new hardware. In real life, especially with used controllers, perfect zero almost never happens.

Real World Readings (Normal vs Problem)

Small axis deviation usually appears when the joystick rests. That is normal. What I watch more is stability.

Watch for these signs:

  • Stable values near center → usually fine
  • Slow wander on one axis → possible drift
  • Constant jitter or twitching numbers → signal noise or wear

I usually run the test for a few minutes. Stable readings stay similar. Drift slowly moves away from center.

Drift Tolerance Guide (When It Is Fine vs Needs Repair)

I check drift using simple tolerance bands. The offset percent shows how far the stick moves from center compared to the full range.

  • ≤1% — Excellent
    Offset stays very close to center. Drift is basically invisible.
  • 1–5% — Normal
    Small deviation appears but games usually handle it with a deadzone.
  • >10% — Needs Attention
    The joystick moves too far from center and drift becomes noticeable.

Example calculation:

Full stick range example: −32767 to +32767

Full span = 65534

If the resting offset reads 600, then:

offset percent = 600 ÷ 65534 ≈ 0.9%

That sits inside the excellent range.

Small offsets often disappear once a deadzone is applied.
You can check it using the deadzone test.

How Games Handle Small Drift (Deadzones Explained)

Most games add an inner deadzone, which ignores small stick movement near the center. This prevents tiny offsets from moving the character or camera.

Typical inner deadzone values range from 5–15%.

Where I usually adjust it:

  • In the in game controller settings
  • Inside sensitivity options
  • Through PC controller calibration tools

And sometimes I check stick calibration settings on PC drivers or controller apps to fine tune the center.

Stick Drift Test: Diagnose Controller Drift Online
I use this stick drift test to check a controller joystick in the browser. It works with PS5, PS4, Xbox, Switch, and PC controllers and shows real time X/Y offsets so I can see if drift looks normal or problematic. Inputs stay in the browser. Connect your controller to start.
Key Takeaways
Stick drift means the joystick sends input even when I’m not touching the stick on the controller.
I run the online stick drift test and watch real time X/Y offsets while the stick rests.
Perfect (0,0) almost never happens. What matters is stable values.
I check tolerance bands: ≤1% excellent, 1–5% normal, >10% needs attention.
I test wired first because Bluetooth interference can create fake drift.
I try fixes in order: clean → calibrate → update firmware or drivers → retest.
Repair shops record before and after test logs and use clear pass or fail rules.
Using the Stick Drift Test
I follow these steps when I run the online stick drift test: https://cyberfanatix.com/stick-drift-test/
Connect the controller
I plug in or pair my controller to the PC. The browser may ask for permissions. I allow it so the page can read joystick input.
Move the joystick
I move the stick in circles and edges. The crosshair and X/Y readout should move in real time.
Release the stick
I let go of the joystick. The crosshair should return near the center.
Watch for drift
If the X/Y values move while I am not touching the stick, that shows drift detection.
Quick tip: Wired vs Wireless
Charge the battery first
Use wired if possible
Move away from USB hubs or Bluetooth devices
Retest to confirm the result
What Stick Drift Means
Stick drift happens when a controller joystick sends idle input even when I am not touching the analogue stick. The system reads a small offset, so the game thinks the stick moved. This usually comes from sensor noise or worn parts.
Sometimes the offset stays in one direction. Other times the X/Y values jitter and jump around. That difference helps later when checking the problem.
How Drift Shows Up (Symptoms You Can Confirm)
Camera drift
The camera slowly moves without touching the stick.
Quick test: open the map or pause screen, take hands off the controller, and watch for about 30 seconds.
Character movement
The character walks or turns on its own.
Quick test: stand still in a game area and see if the character moves.
X/Y values twitching
The X/Y values move even when the stick rests.
Quick test: watch the stick test page and check if numbers keep twitching.
Menu drift or auto scroll
Game menus move by themselves.
Quick test: sit in the menu and see if it keeps scrolling.
Hard to keep aim centered
The crosshair drifts off target.
Quick test: aim at one spot and release the stick.
Common Causes of Stick Drift (Potentiometer vs Hall Effect)
I usually see stick drift come from small hardware issues inside the joystick module.
Common causes:
Potentiometer wear
The joystick uses a potentiometer with a small wiper that slides on a track. Over time the track wears and the signal becomes uneven.
Dust or debris
Dust or debris inside the stick can block smooth movement and create small input jumps.
Plastic wear or looseness
The stick parts develop play after heavy use, which shifts the center point.
Flex cable aging
Old flex cables or connectors can cause electrical noise and jitter in the signal.
Potentiometer vs Hall Effect
Potentiometer sticks
Use physical contact between the wiper and track. Wear and dirt can create drift.
Hall effect sensors
Use magnets and magnetic sensing. No physical contact, so they resist wear better.
According to Adafruit learning resources on potentiometers and hall effect sensors, magnetic sensing avoids the mechanical friction found in traditional potentiometers.
https://learn.adafruit.com
And if someone wants to see how sticks mount inside controllers, iFixit teardowns show the analog modules and replacement steps clearly.
https://www.ifixit.com
One quick tip. If you want to know which stick type a controller uses, I usually check the model online or look at teardown guides before opening anything.
Reading Stick Values Near Center (What (0,0) Actually Means)
When I run a stick drift test, I look at the center point (0,0). That number means the joystick sits in the middle with no input. But real controllers almost never stay at perfect zero. Small deviation happens because of sensor noise and normal wear.
What matters more is stability. If the rest values stay close to the center and do not move much, the stick usually works fine.
I try to keep testing conditions the same:
Place the controller on a flat surface
Do not touch the joystick
Watch the values for a few seconds
Repeat the test a few times to compare the baseline
Running short repeated checks helps me see if the values stay stable or slowly drift.
Ideal Reading
Real World Reading
Stick snaps to (0,0) and stays still
Small deviation around center
No wobble or movement
Tiny value changes appear
Happens mostly in lab conditions
Normal on used controllers

Next step is checking how big the deviation is and whether it falls inside normal tolerance.
Ideal Center (What Perfect Zero Looks Like)
The ideal center means the stick returns exactly to (0,0) with no wobble at all. That usually happens in lab conditions or brand new hardware. In real life, especially with used controllers, perfect zero almost never happens.
Real World Readings (Normal vs Problem)
Small axis deviation usually appears when the joystick rests. That is normal. What I watch more is stability.
Watch for these signs:
Stable values near center → usually fine
Slow wander on one axis → possible drift
Constant jitter or twitching numbers → signal noise or wear
I usually run the test for a few minutes. Stable readings stay similar. Drift slowly moves away from center.
Drift Tolerance Guide (When It Is Fine vs Needs Repair)
I check drift using simple tolerance bands. The offset percent shows how far the stick moves from center compared to the full range.
≤1% — Excellent
Offset stays very close to center. Drift is basically invisible.
1–5% — Normal
Small deviation appears but games usually handle it with a deadzone.
>10% — Needs Attention
The joystick moves too far from center and drift becomes noticeable.
Example calculation:
Full stick range example: −32767 to +32767
Full span = 65534
If the resting offset reads 600, then:
offset percent = 600 ÷ 65534 ≈ 0.9%
That sits inside the excellent range.
Small offsets often disappear once a deadzone is applied.
You can check it using the deadzone test: https://cyberfanatix.com/deadzone-test/
How Games Handle Small Drift (Deadzones Explained)
Most games add an inner deadzone, which ignores small stick movement near the center. This prevents tiny offsets from moving the character or camera.
Typical inner deadzone values range from 5–15%.
Where I usually adjust it:
In the in game controller settings
Inside sensitivity options
Through PC controller calibration tools
If you want to measure it directly, you can run a deadzone test: https://cyberfanatix.com/deadzone-test/
And sometimes I check stick calibration settings on PC drivers or controller apps to fine tune the center.
Standard Drift Test Protocol and Pass or Fail Rules for Repair Shops
I see many repair shops run quick tests, but results change if the process changes. So I prefer a standardized testing workflow. Same steps, same timing, same sample rate, and clear pass or fail criteria.
Drift Test Protocol (Shop Procedure)
Prepare the controller
Place the controller on a flat surface. Do not touch the joystick. Connect it to the test system.
Open the drift test tool
Start the online test or a full controller check tool like https://cyberfanatix.com/.
Begin capture window
Record stick data for 10 to 30 seconds. This capture duration helps show stability.
Use a fixed sampling interval
Poll input every 50 to 100 ms. A steady sample rate keeps readings consistent.
Watch rest values
Observe X and Y offsets while the stick sits at center. Stability matters more than a perfect zero.
Export the data
Save the session using data export or logs. Most tools store readings as a CSV file.
Apply tolerance rules
Compare offset percent with the acceptance threshold:
≤1% excellent
1–5% normal
>10% needs repair
Retest after repair
Run the same protocol again and compare results.
Some shops also confirm results using a second tool like the Analog Stick Test for cross check:
https://cyberfanatix.com/analog-stick-test/
Test Requirements (Keep It Consistent)
Controller sits still on a flat surface
No physical contact during capture
Fixed capture duration between 10 and 30 seconds
Polling interval 50 to 100 ms
Save and keep retention of logs for documentation
Example CSV Data Fields
Most shops store drift logs in a CSV file with columns like:
timestamp
raw X
raw Y
calibrated X
calibrated Y
computed offset percent
This makes it easy to compare before and after repairs.
Evidence Checklist for Warranty or Customer Records
I usually keep a simple repair record pack:
Screenshot of the drift test screen
Exported CSV log file
Short video clip of the test
Photo of the controller condition
This small evidence set protects the shop during warranty claims and clearly shows the controller state before and after repair.
Quick Fix Steps and Advanced Troubleshooting (Follow This Order)
I usually start with the simple fixes first. Many stick drift cases come from dust, calibration errors, or software issues. Only after those checks do I move to repair or warranty steps.
Decision flow I follow:
If drift looks small → try quick fixes first
If drift stays after cleaning and calibration → move to advanced troubleshooting
If the controller is still under warranty → contact the manufacturer before opening it
If drift remains severe → consider professional repair or replacing the stick module
Basic isolation helps too. I often run a wired test before assuming the joystick is broken, since wireless noise or interference can create false drift readings.
Safety rules matter here. I always power off the controller before cleaning, use water free isopropyl alcohol, and let the stick dry fully before turning it back on.
Quick Fix Checks (Fast Steps That Solve Most Cases)
Diagnostic order:
Power off → Clean → Wired test → Calibrate → Update → Repeat test
Clean the joystick area
Power off the controller first. Blow compressed air around the stick gap. If needed, apply a tiny amount of isopropyl alcohol on the edge and move the stick gently. Let it dry fully before powering on.
Run a wired test
Connect the controller using a cable. This removes Bluetooth interference that can cause fake drift readings.
Calibrate the controller
Run a stick calibration test to reset the center position.
https://cyberfanatix.com/stick-calibration-test/
Update firmware or drivers
Install the latest firmware update or PC drivers. Old firmware sometimes causes input errors.
After these steps, I usually retest the joystick to see if the drift changed.
Advanced Troubleshooting (Repair, Replace, or Warranty)
If quick fixes fail, the problem usually sits inside the joystick hardware.
Possible repair paths:
Replace the potentiometer inside the joystick module
Replace the entire joystick module assembly
Send the controller to a professional repair service
But I always check warranty first.
Warranty first rules
Do not open the controller shell while the warranty still applies
Opening it may cancel manufacturer coverage
Contact official support before doing hardware repair
For example:
According to Nintendo Joy Con support guidance, users should contact Nintendo support first for stick issues.
https://www.nintendo.com
Xbox Support troubleshooting and warranty steps explain official repair options for controller problems.
https://support.xbox.com
If someone wants to see how stick modules get replaced, iFixit teardown guides show the internal parts clearly.
https://www.ifixit.com
Advanced Electrical Diagnostics: Testing Potentiometer Noise
Technicians sometimes confirm joystick failure using electrical tools. This helps prove whether the potentiometer track is worn or just dirty.
Typical joystick potentiometers measure about 10 kΩ resistance.
Diagnostic workflow
Multimeter resistance sweep
Connect the multimeter across the potentiometer terminals. Slowly move the joystick and watch the resistance sweep.
Check continuity stability
Smooth resistance change means the track likely works. Sudden jumps may indicate wiper noise or worn contact paths.
Oscilloscope signal check (optional)
Connect an oscilloscope to monitor the analog output signal. Watch the signal noise floor while moving the stick.
Look for jitter patterns
Small smooth waves look normal. Random spikes or dropouts suggest contamination or worn potentiometer tracks.
Pass vs fail indicators
Smooth resistance sweep → potentiometer likely healthy
Sharp spikes or dropouts → worn track or internal debris
Constant jitter → possible electrical noise or bad connection
According to Tektronix application notes on oscilloscope signal analysis, noise and unstable signal patterns often indicate hardware faults in analog sensors.
https://www.tek.com
Repair log evidence I usually save
multimeter readings
oscilloscope screenshots
notes from the resistance sweep test
Keeping these records helps explain the diagnosis and supports repair documentation.
Repair Shop Pricing Guide: Hall Effect Upgrade vs Standard Stick Replacement
When I price a controller repair, I do not look only at the part price. I check the full cost breakdown and the expected ROI. A hall effect upgrade costs more up front, but it often reduces repeat drift problems compared to a normal stock stick replacement.
Basic Cost Breakdown (Typical Shop Factors)
Cost Component
What It Covers
Parts cost
joystick module or hall effect upgrade kit
Labor time
opening controller, soldering, installing module
Testing time
stick drift test, calibration check, retest
Warranty reserve
small buffer for returns or defects
Shop overhead
tools, electricity, workspace
Margin
profit after all repair costs

These pieces together determine the final repair pricing.
Simple Pricing Formula Example
I usually keep pricing simple:
Repair price = (parts cost + labor cost + testing time + warranty reserve) × margin
This structure helps the shop stay profitable without guessing prices.
When a Hall Effect Upgrade Makes Sense
A hall effect sensor stick resists wear because it uses magnetic sensing instead of contact tracks. That means fewer future drift problems.
I consider upselling it when:
The controller value is high (premium or limited edition)
The customer wants long term durability
The repair already involves full stick replacement
The shop offers an extended repair warranty
Quick Decision Checklist
Before recommending a repair option, I usually check:
Is the controller worth upgrading?
Does the customer want lowest cost or longest lifespan?
Will the hall effect upgrade reduce future warranty claims?
Is this a repeat customer who values reliability?
If the answer to several of those is yes, the hall effect upgrade often provides better long term value for both the shop and the customer.
Customer Disclosure and Warranty Templates for Repaired or Resold Controllers
When I sell or return a repaired controller, I always include a clear refurbished disclosure and simple warranty policy. This builds trust and avoids confusion later. I also attach proof from the repair test so the customer can see the condition before and after service.
What I Disclose to Customers
The controller condition and refurbished disclosure
The repair type performed on the joystick or module
The shop warranty policy and return policy
A short service ticket summary of the repair
Test results from the stick drift test log
Before and after photos of the controller condition
Including a post repair test log helps show that the controller passed testing at the time of service.
Template 1: Product Listing Disclosure
Condition Notice
This controller received a joystick inspection and repair. The unit passed a post repair stick drift test log with stable center readings. Normal cosmetic wear may exist. The listing includes a refurbished disclosure and limited warranty policy.
Template 2: Limited Warranty Line
Warranty Statement
This controller includes a limited service warranty covering the repaired joystick module for the defined service period. Damage caused by drops, liquid exposure, or modification falls outside the warranty policy. Please contact support with your service ticket and test results if an issue appears.
Template 3: Service Ticket Note
Repair Record
Controller model inspected and repaired. Joystick module tested before and after service. Results recorded in the test log and attached to the service ticket. Customer advised to test the controller after receiving the unit.
Evidence Submission Checklist (For Claims or Returns)
If a customer reports a problem, I usually ask for basic evidence submission:
Short video showing the issue
Screenshot or export of the test log
Photo of the controller condition
The original service ticket reference
Best practice uses timestamped video and test log files. This makes it easier to confirm issues and keeps the repair process fair for both the shop and the customer.
Find Other Controller Tests to Complete the Check
Sometimes stick drift is only one part of the problem. I usually run a few extra controller tests to confirm if the issue affects only the joystick or the whole input system.
Analog Stick Test
https://cyberfanatix.com/analog-stick-test/
Checks full joystick movement, edge range, and axis response.
Deadzone Test
Shows how much input the game ignores near the center. Helps confirm small drift problems.
Stick Calibration Test
https://cyberfanatix.com/stick-calibration-test/
Verifies stick calibration and center position after adjustments.
Full Controller Input Test
Checks buttons, triggers, and overall controller input to rule out other hardware issues.
Frequently Asked Questions (FAQ)
1. Which controllers work with this online stick drift test?
This online stick drift test works with most modern controller models that connect to a browser through USB or Bluetooth. That includes PS5, PS4, Xbox, Switch, and PC controllers. I usually connect the controller first, open the test page, and the joystick input appears automatically if the browser detects it.
2. What does it mean if my stick never returns to exactly (0,0)?
A joystick almost never sits at perfect (0,0). Small rest values happen because of sensor noise or normal wear. What matters more is stability. If the numbers stay close to center and do not wander, the controller usually works fine.
3. How do I tell real stick drift from wireless or Bluetooth interference?
I usually run a quick wired test. If drift disappears when the controller is plugged in, the issue may come from Bluetooth interference or a weak signal. Nearby USB hubs, wireless devices, or low battery can also affect input readings.
4. Can calibration, firmware, or drivers actually fix drift?
Sometimes they help. Calibration, firmware updates, or new drivers can correct incorrect center readings or software issues. But if the joystick hardware is worn, those fixes usually reduce symptoms rather than fully fixing the drift.
5. Why does my game drift but the test looks normal?
Some games use different deadzone settings or input filters. If the game deadzone is very small, even tiny joystick movement may appear as drift. The online test shows raw controller input, while games apply their own control rules.
6. What deadzone should I use if my game supports it?
Most games apply an inner deadzone between 5% and 15%. A small deadzone keeps movement precise. A larger one hides small drift but reduces fine aim control. I usually increase it slowly until the drift stops.
7. When should I stop DIY fixes and contact the manufacturer?
If cleaning, calibration, and firmware updates do not help, and the controller still has warranty, it is better to contact the manufacturer.
According to official Nintendo support guidance, users should check warranty service before attempting repairs.
https://www.nintendo.com
Xbox Support also provides official troubleshooting and repair steps for controllers.
https://support.xbox.com
Opening the controller during warranty may void coverage.
8. What evidence should I collect for a repair claim or return?
I usually gather simple documentation before submitting a claim:
Screenshot or export of the stick drift test log
Short video showing the joystick drifting
Photos of the controller condition
The model number and serial information
Clear video proof and timestamped test logs make warranty claims easier and reduce disputes with support teams.

Standard Drift Test Protocol and Pass or Fail Rules for Repair Shops

I see many repair shops run quick tests, but results change if the process changes. So I prefer a standardized testing workflow. Same steps, same timing, same sample rate, and clear pass or fail criteria.

Drift Test Protocol (Shop Procedure)

  1. Prepare the controller
    Place the controller on a flat surface. Do not touch the joystick. Connect it to the test system.
  2. Open the drift test tool
    Start the online test or a full controller check tool like.
  3. Begin capture window
    Record stick data for 10 to 30 seconds. This capture duration helps show stability.
  4. Use a fixed sampling interval
    Poll input every 50 to 100 ms. A steady sample rate keeps readings consistent.
  5. Watch rest values
    Observe X and Y offsets while the stick sits at center. Stability matters more than a perfect zero.
  6. Export the data
    Save the session using data export or logs. Most tools store readings as a CSV file.
  7. Apply tolerance rules
    Compare offset percent with the acceptance threshold:
    • ≤1% excellent
    • 1–5% normal
    • >10% needs repair
  8. Retest after repair
    Run the same protocol again and compare results.

Some shops also confirm results using a second tool like the Analog Stick Test for cross check.

Test Requirements (Keep It Consistent)

  • Controller sits still on a flat surface
  • No physical contact during capture
  • Fixed capture duration between 10 and 30 seconds
  • Polling interval 50 to 100 ms
  • Save and keep retention of logs for documentation

Example CSV Data Fields

Most shops store drift logs in a CSV file with columns like:

  • timestamp
  • raw X
  • raw Y
  • calibrated X
  • calibrated Y
  • computed offset percent

This makes it easy to compare before and after repairs.

Evidence Checklist for Warranty or Customer Records

I usually keep a simple repair record pack:

  • Screenshot of the drift test screen
  • Exported CSV log file
  • Short video clip of the test
  • Photo of the controller condition

This small evidence set protects the shop during warranty claims and clearly shows the controller state before and after repair.

Quick Fix Steps and Advanced Troubleshooting (Follow This Order)

I usually start with the simple fixes first. Many stick drift cases come from dust, calibration errors, or software issues. Only after those checks do I move to repair or warranty steps.

Decision flow I follow:

  • If drift looks small → try quick fixes first
  • If drift stays after cleaning and calibration → move to advanced troubleshooting
  • If the controller is still under warranty → contact the manufacturer before opening it
  • If drift remains severe → consider professional repair or replacing the stick module

Basic isolation helps too. I often run a wired test before assuming the joystick is broken, since wireless noise or interference can create false drift readings.

Safety rules matter here. I always power off the controller before cleaning, use water free isopropyl alcohol, and let the stick dry fully before turning it back on.

Quick Fix Checks (Fast Steps That Solve Most Cases)

Diagnostic order:
Power off → Clean → Wired test → Calibrate → Update → Repeat test

  1. Clean the joystick area
    Power off the controller first. Blow compressed air around the stick gap. If needed, apply a tiny amount of isopropyl alcohol on the edge and move the stick gently. Let it dry fully before powering on.
  2. Run a wired test
    Connect the controller using a cable. This removes Bluetooth interference that can cause fake drift readings.
  3. Calibrate the controller
    Run a stick calibration test to reset the center position.
  4. Update firmware or drivers
    Install the latest firmware update or PC drivers. Old firmware sometimes causes input errors.

After these steps, I usually retest the joystick to see if the drift changed.

Advanced Troubleshooting (Repair, Replace, or Warranty)

If quick fixes fail, the problem usually sits inside the joystick hardware.

Possible repair paths:

  • Replace the potentiometer inside the joystick module
  • Replace the entire joystick module assembly
  • Send the controller to a professional repair service

But I always check warranty first.

Warranty first rules

  • Do not open the controller shell while the warranty still applies
  • Opening it may cancel manufacturer coverage
  • Contact official support before doing hardware repair

For example:

If someone wants to see how stick modules get replaced, iFixit teardown guides show the internal parts clearly.

Advanced Electrical Diagnostics: Testing Potentiometer Noise

Technicians sometimes confirm joystick failure using electrical tools. This helps prove whether the potentiometer track is worn or just dirty.

Typical joystick potentiometers measure about 10 kΩ resistance.

Diagnostic workflow

  1. Multimeter resistance sweep
    Connect the multimeter across the potentiometer terminals. Slowly move the joystick and watch the resistance sweep.
  2. Check continuity stability
    Smooth resistance change means the track likely works. Sudden jumps may indicate wiper noise or worn contact paths.
  3. Oscilloscope signal check (optional)
    Connect an oscilloscope to monitor the analog output signal. Watch the signal noise floor while moving the stick.
  4. Look for jitter patterns
    Small smooth waves look normal. Random spikes or dropouts suggest contamination or worn potentiometer tracks.

Pass vs fail indicators

  • Smooth resistance sweep → potentiometer likely healthy
  • Sharp spikes or dropouts → worn track or internal debris
  • Constant jitter → possible electrical noise or bad connection

According to Tektronix application notes on oscilloscope signal analysis, noise and unstable signal patterns often indicate hardware faults in analog sensors.

Repair log evidence I usually save

  • multimeter readings
  • oscilloscope screenshots
  • notes from the resistance sweep test

Keeping these records helps explain the diagnosis and supports repair documentation.

Repair Shop Pricing Guide: Hall Effect Upgrade vs Standard Stick Replacement

When I price a controller repair, I do not look only at the part price. I check the full cost breakdown and the expected ROI. A hall effect upgrade costs more up front, but it often reduces repeat drift problems compared to a normal stock stick replacement.

Basic Cost Breakdown (Typical Shop Factors)

Cost ComponentWhat It Covers
Parts costjoystick module or hall effect upgrade kit
Labor timeopening controller, soldering, installing module
Testing timestick drift test, calibration check, retest
Warranty reservesmall buffer for returns or defects
Shop overheadtools, electricity, workspace
Marginprofit after all repair costs

These pieces together determine the final repair pricing.

Simple Pricing Formula Example

I usually keep pricing simple:

Repair price = (parts cost + labor cost + testing time + warranty reserve) × margin

This structure helps the shop stay profitable without guessing prices.

When a Hall Effect Upgrade Makes Sense

A hall effect sensor stick resists wear because it uses magnetic sensing instead of contact tracks. That means fewer future drift problems.

I consider upselling it when:

  • The controller value is high (premium or limited edition)
  • The customer wants long term durability
  • The repair already involves full stick replacement
  • The shop offers an extended repair warranty

Quick Decision Checklist

Before recommending a repair option, I usually check:

  • Is the controller worth upgrading?
  • Does the customer want lowest cost or longest lifespan?
  • Will the hall effect upgrade reduce future warranty claims?
  • Is this a repeat customer who values reliability?

If the answer to several of those is yes, the hall effect upgrade often provides better long term value for both the shop and the customer.

Customer Disclosure and Warranty Templates for Repaired or Resold Controllers

When I sell or return a repaired controller, I always include a clear refurbished disclosure and simple warranty policy. This builds trust and avoids confusion later. I also attach proof from the repair test so the customer can see the condition before and after service.

What I Disclose to Customers

  • The controller condition and refurbished disclosure
  • The repair type performed on the joystick or module
  • The shop warranty policy and return policy
  • A short service ticket summary of the repair
  • Test results from the stick drift test log
  • Before and after photos of the controller condition

Including a post repair test log helps show that the controller passed testing at the time of service.

Template 1: Product Listing Disclosure

Condition Notice

This controller received a joystick inspection and repair. The unit passed a post repair stick drift test log with stable center readings. Normal cosmetic wear may exist. The listing includes a refurbished disclosure and limited warranty policy.

Template 2: Limited Warranty Line

Warranty Statement

This controller includes a limited service warranty covering the repaired joystick module for the defined service period. Damage caused by drops, liquid exposure, or modification falls outside the warranty policy. Please contact support with your service ticket and test results if an issue appears.

Template 3: Service Ticket Note

Repair Record

Controller model inspected and repaired. Joystick module tested before and after service. Results recorded in the test log and attached to the service ticket. Customer advised to test the controller after receiving the unit.

Evidence Submission Checklist (For Claims or Returns)

If a customer reports a problem, I usually ask for basic evidence submission:

  • Short video showing the issue
  • Screenshot or export of the test log
  • Photo of the controller condition
  • The original service ticket reference

Best practice uses timestamped video and test log files. This makes it easier to confirm issues and keeps the repair process fair for both the shop and the customer.

Frequently Asked Questions (FAQ)

Which controllers work with this online stick drift test?

This online stick drift test works with most modern controller models that connect to a browser through USB or Bluetooth. That includes PS5, PS4, Xbox, Switch, and PC controllers. I usually connect the controller first, open the test page, and the joystick input appears automatically if the browser detects it.

What does it mean if my stick never returns to exactly (0,0)?

A joystick almost never sits at perfect (0,0). Small rest values happen because of sensor noise or normal wear. What matters more is stability. If the numbers stay close to center and do not wander, the controller usually works fine.

How do I tell real stick drift from wireless or Bluetooth interference?

I usually run a quick wired test. If drift disappears when the controller is plugged in, the issue may come from Bluetooth interference or a weak signal. Nearby USB hubs, wireless devices, or low battery can also affect input readings.

Can calibration, firmware, or drivers actually fix drift?

Sometimes they help. Calibration, firmware updates, or new drivers can correct incorrect center readings or software issues. But if the joystick hardware is worn, those fixes usually reduce symptoms rather than fully fixing the drift.

Why does my game drift but the test looks normal?

Some games use different deadzone settings or input filters. If the game deadzone is very small, even tiny joystick movement may appear as drift. The online test shows raw controller input, while games apply their own control rules.

What deadzone should I use if my game supports it?

Most games apply an inner deadzone between 5% and 15%. A small deadzone keeps movement precise. A larger one hides small drift but reduces fine aim control. I usually increase it slowly until the drift stops.

When should I stop DIY fixes and contact the manufacturer?

If cleaning, calibration, and firmware updates do not help, and the controller still has warranty, it is better to contact the manufacturer.
According to official Nintendo support guidance, users should check warranty service before attempting repairs.
Xbox Support also provides official troubleshooting and repair steps for controllers.
Opening the controller during warranty may void coverage.

What evidence should I collect for a repair claim or return?

I usually gather simple documentation before submitting a claim:
Screenshot or export of the stick drift test log
Short video showing the joystick drifting
Photos of the controller condition
The model number and serial information
Clear video proof and timestamped test logs make warranty claims easier and reduce disputes with support teams.