
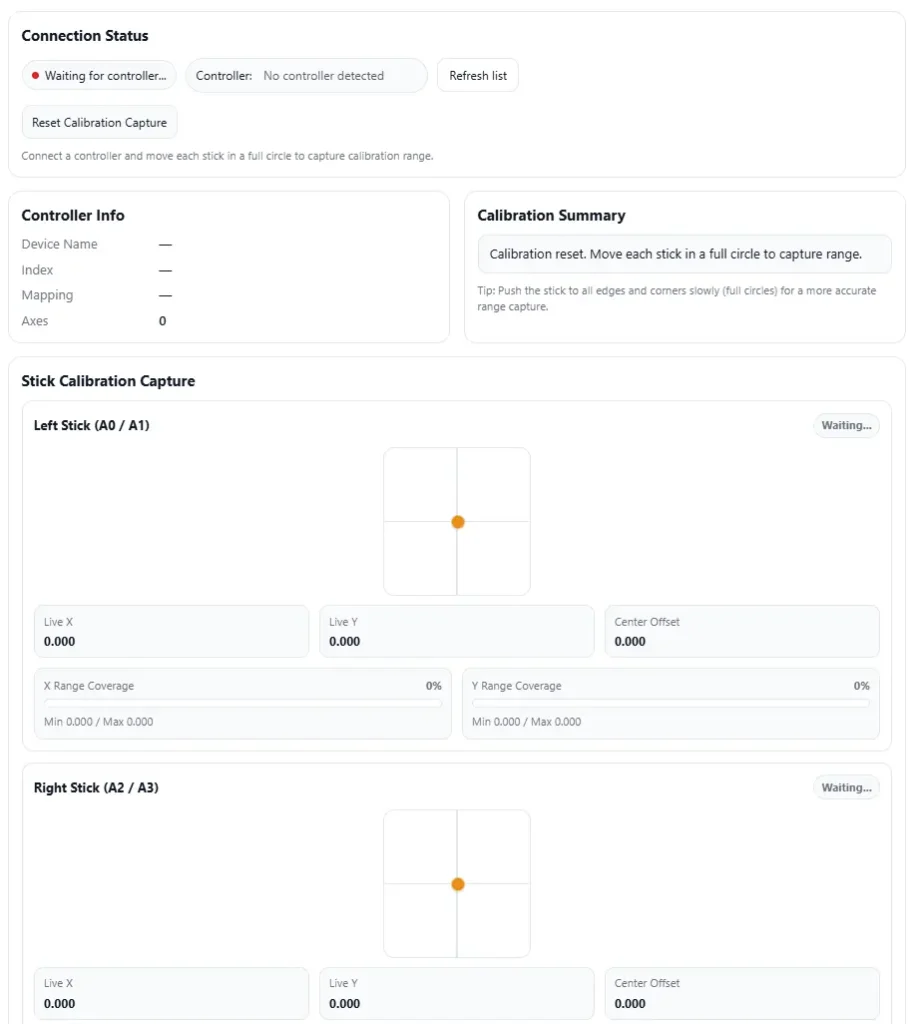
Stick Calibration Test
Test and calibrate controller analog stick range online. Capture center, min/max values, and range coverage for left and right sticks.
Connection Status
Connect a controller and move each stick in a full circle to capture calibration range.
Controller Info
Calibration Summary
Tip: Push the stick to all edges and corners slowly (full circles) for a more accurate range capture.
Stick Calibration Capture
This tool captures observed stick range in your browser session. Use “Reset Calibration Capture” to start a new measurement.
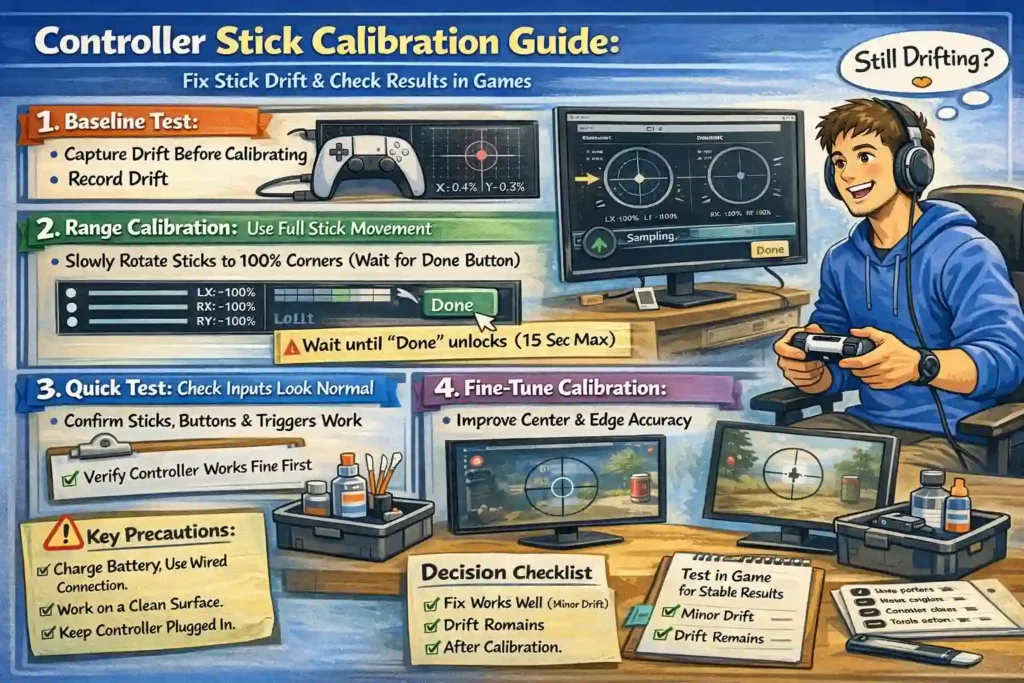
Controller Stick Calibration Guide (GUI): Fix Stick Drift, Check Results in Games, and Decide the Next Step
Stick drift happens a lot with controllers. The camera or character moves even when the stick sits still. Kind of annoying, honestly.
Stick calibration helps fix that. The calibration GUI lets the controller relearn the center and full movement range of the sticks. After that, you test it in games to see if the drift actually stopped.
But a few small steps matter before and after calibration. Skipping them can lead to bad results.
Key Takeaways
- Check battery and wired connection before calibration. Low power can break the write process.
- Capture a baseline first. Watch the stick center for 30–60 seconds to see drift.
- During range calibration, rotate sticks slowly. The Done button unlocks after about 15 seconds.
- Run a Quick Test to confirm basic controller functions.
- Finetune center and circularity to improve stick accuracy.
- Test results in real games. Use 30–60 seconds static and 2–5 minutes gameplay checks.
- If drift remains, consider cleaning, repair, hall effect upgrade, or replacement.
- Opening controllers has risks. Follow ESD safety and Li-ion battery precautions.
Before You Start: Safety Checks Before Stick Calibration
Well, before touching the Calibration GUI, I usually do a quick safety check. This takes maybe 2–3 minutes, but it saves a lot of trouble later. Calibration writes data to the controller, so power or connection issues can mess things up.
Also, this tool runs independently. It is not affiliated with controller manufacturers, so use it at your own risk. According to Sony/PlayStation Support, people should try official troubleshooting first if the controller is new or still under warranty.
Quick pre check before calibration:
- Make sure the internal battery has charge. Stop if the battery is low during calibration writes.
- Use a wired connection instead of Bluetooth. USB keeps the signal stable.
- Close apps that read controllers. For example Steam, DS4Windows, or similar tools.
- Keep the controller powered and connected the whole time.
- Work on a clean, stable surface so the sticks can sit naturally.
- Avoid static electricity. Basic ESD safety helps prevent small electrical damage.
- Don’t disconnect the controller during calibration.
- Tools may collect basic analytics like usage events for debugging.
I usually recommend this simple rule.
Try temporary calibration first.
Only write permanent calibration after you confirm the results look correct.
Step 1: Capture a Baseline First (So You Can Compare Results)
I see many people skip this step. Then they run calibration and later ask, “Did it actually improve?” Hard to tell without a baseline capture.
So first, record how the stick behaves before calibration. Watch the joystick visualization while the stick sits at center. This shows the real neutral values and small drift movements.
Hold the stick untouched for 30–60 seconds. That time window usually shows if drift appears or if the center stays stable.
You can use tools like the analog stick test or a stick drift test to see the values clearly.
According to Microsoft Support, Windows also includes built in controller testing tools that help verify stick inputs before and after calibration.
Steps to Capture a Baseline
- Connect the controller using a wired connection.
- Open a controller tester and watch the joystick visualization.
- Leave the stick untouched for 30–60 seconds.
- Take a screenshot of the neutral position values.
- Repeat once if the drift looks inconsistent.
What to Record (Before and After Evidence)
Keep a small evidence bundle. This helps with repair or warranty claims later.
Record these details:
- Timestamp of the test
- Controller model
- Neutral values screenshot
- Notes about drift direction (left, right, up, down)
- How often the drift appears
After calibration, you run the same test again. Then compare the before and after results for proper controller calibration verification.
Step 2: Range Calibration to Capture Full Stick Movement
Range calibration teaches the controller the full travel range of the sticks. The system collects sampling data while you move the sticks across every direction.
The calibration GUI usually shows LX, LY, RX, and RY values while this happens. A progress bar fills as the system records movement.
Just move the sticks slowly and cover the whole circle. The goal is to show the controller its full motion range.
How to Run Range Calibration
- Start range calibration inside the tool.
- Slowly rotate the sticks in full circles.
- Move each stick around the edge at least two full rotations.
- Watch the progress bar as sampling data updates.
- Keep rotating even if the progress looks slow.
- Wait until the Done button unlocks.
The Done button unlocks after at most 15 seconds. If you press Done too early, the tool may save incomplete calibration data.
⚠️ Warning
Pressing the Done button early can create incomplete calibration. Always wait until sampling finishes.
If Sampling Stalls or the Progress Bar Stops
Sometimes the calibration looks stuck. Usually it is a connection or software issue.
Try these quick fixes:
Try 1
- Use wired USB power instead of Bluetooth.
Try 2
- Keep rotating the sticks for 15–20 seconds.
Try 3
- Close controller apps like Steam or DS4Windows.
Try 4
- Try a different USB cable or port.
Try 5
- Disable USB power saving in system settings.
Most of the time, one of these fixes resolves sampling stalls and the progress bar starts moving again.
Step 3: Run a Quick Test Before Fine Tuning
Before touching detailed calibration settings, run a Quick Test. This check confirms the controller still works normally after the earlier steps. It tests sticks, buttons, and triggers so you know the hardware behaves correctly.
⚠️ Battery Warning
Low battery level can cause strange results. Controllers sometimes enter power saving mode, and that can trigger failed tests or random disconnects. If the battery looks low, charge it first before continuing.
What the Quick Test Shows
The Quick Test screen usually organizes checks inside an accordion style layout. Each section expands to show a specific test.
You may see:
- Stick movement checks
- Button input checks
- Trigger response tests
- Connection stability checks
As the tests run, the test summary updates automatically. If needed, you can add skipped tests from the dropdown menu and run them again.
If a Test Fails
If Quick Test shows disconnects or power problems, stop there.
Do not start finetune calibration yet.
Instead fix the issue first:
- Check the USB cable or wired connection
- Charge the controller battery
- Close apps that interfere with controller input
Only continue calibration after the controller passes the Quick Test without errors.
Step 4: Finetune Stick Calibration Using Center Mode and Circularity Mode
After the basic calibration steps, the next part is finetuning. This step improves how the stick behaves around the center and how evenly it moves in all directions.
The calibration GUI usually gives two modes.
Center mode (L1) fixes the stick resting position.
Circularity mode (R1) fixes uneven movement around the edge.
Both modes work together. First fix the center. Then adjust circularity.
Sometimes numbers look perfect but the game still feels strange. So I usually run a temporary calibration first, test it in a game, and only then write the permanent calibration.
If needed, you can later run a deadzone test to see how the stick behaves around the center.
Controls You Will See in the Calibration GUI
Most calibration tools show a few common controls.
- Raw numbers toggle – shows exact stick values
- Step size – controls how big each adjustment is
- Undo – reverses the last change
- Quick calibrate – resets or auto adjusts values
- Direction sliders or inputs for fine movement control
Some tools also show raw values from 0 to 65535 for precise adjustments.
Center mode (L1): Recenter the Stick
Center mode fixes the neutral position. This helps when the stick drifts slightly even when untouched.
Steps to Recenter the Stick
- Press L1 to enter center mode.
- Select the stick you want to adjust.
- Release the stick so it rests naturally in the center.
- Use the D-pad to adjust the center position.
- Adjust slowly using the selected step size.
- Watch the visual indicator until the stick sits close to the center.
⚠️ Warning
Do not adjust while the stick is still tilted.
That is a common mistake. The system will read a false center.
Success sign
The stick indicator stays near the center with minimal movement when untouched.
Circularity mode (R1): Reduce Non Circular Stick Movement
After fixing the center, switch to circularity mode. This step improves how evenly the stick moves around the edge.
Some sticks move slightly uneven. That creates non circular movement and directional bias.
In circularity mode, the tool highlights progress using lightblue sectors.
Steps to Adjust Circularity
- Press R1 to enter circularity mode.
- Move the stick fully to one direction.
- Hold the stick at that direction.
- Adjust the value using sliders or inputs.
- Repeat for all four directions.
- Up
- Down
- Left
- Right
- Watch the lightblue sectors appear as adjustments improve circular movement.
- Use quick calibrate if the tool supports it.
- Use undo if an adjustment makes things worse.
The system calculates an average circularity error.
Most tools suggest a 7–9% target.
Factory calibration from Sony usually sits around 10%.
Practical Circularity Guide
Numbers help, but they are not everything. Here is a simple interpretation guide.
- Below 5%
Very accurate movement. Usually great for precision games. - 5–9%
Normal range. Most controllers feel good here. - 10–15%
Acceptable but may feel slightly uneven. - Above 15%
Likely hardware wear or stick damage.
According to the Adafruit Learning System, traditional controller sticks use potentiometers that wear down over time. Hall effect sensors use non contact sensing, so they wear less. That explains why circularity problems can return after heavy use.
One Important Tip
Do not chase perfect numbers.
Sometimes a stick with 8–9% circularity feels better than one tuned aggressively to 3–4%.
What matters most is real gameplay feel.
So the usual workflow looks like this:
Temporary calibration
Test in a game
Adjust again if needed
Then save permanent calibration
That small step saves a lot of frustration later.
Stick Center Calibration Wizard (Four Corner Method)
Some calibration tools include a stick center calibration wizard. This wizard uses a simple four corner method to calculate the correct center position.
The tool asks you to move both sticks to specific corners of their range. The system records the movement and then calculates the center automatically.
Before starting, do a quick check.
Make sure the controller has stable power and nothing blocks the sticks. Move them gently to the frame edge. Do not push hard.
Wizard Steps
- Move both sticks to the top left corner.
Release them and press Continue. - Move both sticks to the top right corner.
Release them and press Continue. - Move both sticks to the bottom left corner.
Release them and press Continue. - Move both sticks to the bottom right corner.
Release them and press Continue.
The wizard finishes after these four steps.
⚠️ Important Warning
Once the wizard starts, it cannot be canceled.
Do not close the page and do not disconnect the controller.
If you are unsure, some tools offer a quick calibrate option instead. That method runs a faster automatic adjustment.
In Progress Screens: Calibrating Center and Storing Calibration
Calibrating Center
During this stage, the system begins calibrating center values inside the stick modules. A progress bar shows how much of the process is complete. Do not move the sticks while this step runs.
Storing Calibration
Next the tool starts storing calibration data. This writes the new values to the controller hardware. A progress bar usually shows the saving status.
⚠️ Do not disconnect the controller or close the page during this process.
If the calibration fails, avoid repeating the process many times. First check power, cable connection, and USB stability, then capture a new baseline before trying again.
Calibration History, Saved Profiles, and Exporting Before and After Evidence
After calibration, most tools keep a calibration history. This section stores your saved calibrations so you can review changes or restore an older profile if something feels wrong.
Sometimes the history panel may show “No saved calibrations found.” That just means nothing has been stored yet.
Once you run calibration and save it, the tool records the data for later comparison.
What Calibration History Usually Contains
- Timestamp of the calibration
- Controller model or device name
- Center values or adjustment settings
- Notes about drift or stick behavior
- Option to restore an earlier calibration
- Option to clear all saved entries
Saving this information helps track the before and after difference.
How to Export Evidence
Keeping proof of calibration results can help with repair requests or warranty claims.
Basic steps:
- Capture a baseline screenshot before calibration.
- Run the calibration process.
- Take another screenshot after calibration.
- Export or save the test results if the tool supports export.
According to jstest-gtk documentation and tools like gamepad-tester.com, real time axis visualization helps verify stick center and edge movement across different systems.
Example Evidence Entry
A typical saved record may include:
- Test timestamp
- Controller model
- Before screenshot
- After screenshot
- Short drift notes
Simple Support Packet
If you contact support or a repair shop, include:
- Controller serial or photo
- Baseline screenshot
- Post calibration screenshot
- Notes from in game testing
This small packet helps technicians quickly understand the problem and confirm the calibration results.
How to Test Calibration in Real Games: Simple Scenarios and Pass or Fail Checks
After calibration, the real test happens inside games. Tools can show numbers, but gameplay shows the real result.
So I usually run a small gameplay drift test. The idea is simple. Use the same settings before and after calibration. Same deadzone, same sensitivity, same controller.
First run a short static check. Leave the stick untouched for 30–60 seconds and watch if the camera or character moves.
Then run a short active test. Play normally for 2–5 minutes. This shows how the stick behaves during real movement.
Simple Before and After Method
Use the same routine both times.
- Open the same game mode or map.
- Keep the same controller settings.
- Record the before calibration result.
- Run calibration.
- Repeat the exact test and record the after result.
This makes controller calibration verification much easier.
FPS Aiming Test (Micro Drift and Tracking Stability)
FPS games show stick problems quickly. Even small drift can move the crosshair.
Test Steps
- Enter a practice range or shooting range.
- Aim at a wall or object.
- Release the stick and wait 30–60 seconds.
- Watch if the crosshair slowly moves.
- Then track a moving target for 2–5 minutes.
- Use slow micro adjustments while aiming.
- Repeat the test for both sticks if aiming uses them.
Pass or Fail Check
Pass
- Crosshair stays still during the idle test
- Small adjustments feel smooth
- Tracking targets feels stable
Fail
- Crosshair slowly moves on its own
- You constantly correct the aim
- Tracking feels uneven or jumpy
This simple routine works well as an aim drift benchmark.
Racing and Steering Test (Center Hold and Linear Sweep)
Racing games are great for checking steering linearity.
Test Steps
- Start a time trial or free drive mode.
- Hold the stick centered for 30–60 seconds.
- Watch if the car drifts left or right.
- Slowly turn the stick from center to full left.
- Return to center and repeat to the right.
- Drive normally for 2–5 minutes.
What Good Steering Feels Like
- Smooth turning from center to edge
- No sudden jumps in steering
- Car holds straight line when stick stays centered
Pass or Fail
Pass
- Car drives straight with centered stick
- Steering response feels smooth
Fail
- Car slowly pulls left or right
- Steering suddenly jumps instead of moving smoothly
This works well as a racing steering drift test.
Platformer or Menu Navigation Test (Precision Movement)
Platformers and menus reveal very small stick errors.
Test Steps
- Open a game menu or inventory screen.
- Leave the stick untouched for 30–60 seconds.
- Watch if the menu cursor drift appears.
- Try very small taps on the stick.
- Move one item at a time.
Pass or Fail Check
Pass
- Cursor stays still during idle test
- Small taps move exactly one step
- Movement feels predictable
Fail
- Cursor slowly moves on its own
- Small taps jump multiple items
These tests help confirm if calibration actually fixed precision movement issues.
If the controller passes most of these checks, the calibration likely worked. If not, the problem might come from hardware wear instead of software settings.
Decision Guide: When to Clean, Repair, Replace, or Upgrade Your Controller
Sometimes calibration fixes the problem. Sometimes it does not. That is where a simple stick drift decision helps.
I usually check a few symptoms first. These signs tell whether the issue comes from dirt, wear, or a failing stick module.
Common Symptoms to Watch
- Stick slowly moves when untouched
- Controller cannot hold the center position
- Movement jumps or skips during gameplay
- Drift returns quickly after calibration
- Stick feels loose or uneven
If one or two of these appear, cleaning might fix it. But if the stick cannot hold center after calibration, that often means hardware wear.
According to iFixit, stick modules and their internal parts vary by controller model, and safe repair steps depend on the device design.
Simple Action Table
| Symptom | Recommended Action | Cost Range | Skill Level |
| Minor drift after long use | Clean stick area or replace small parts | <$10–$20 | Beginner |
| Drift returns after calibration | Potentiometer replacement | $10–$40 | Intermediate |
| Uneven movement or circularity issues | Hall effect upgrade | $40–$120 | Advanced |
| Multiple hardware issues | Buy refurbished controller | $30–$80 | Easy |
This table helps answer the common question: repair vs replace controller.
Cleaning works when dust or debris causes drift. Hardware repair works when the internal sensor wears out.
Quick Scoring Checklist (Severity × Frequency × Budget)
I like using a simple scoring method. Rate each factor from 1 to 3.
Severity
1 = Very small drift
2 = Noticeable drift
3 = Severe drift
Frequency
1 = Rare
2 = Happens sometimes
3 = Happens constantly
Budget
1 = Very limited
2 = Moderate budget
3 = Willing to spend more
Result Guide
- Score 3–4
Try cleaning first. - Score 5–6
Repair the stick module. - Score 7–8
Consider a hall effect upgrade. - Score 9
Replacement or refurbished controller may be easier.
Hardware Basics: Potentiometer vs Hall Effect
Controllers use sensors to measure stick movement. Two types are common.
Potentiometer sticks
- Use physical contact to measure position
- Internal parts slowly wear down
- Dust and friction cause drift over time
Hall effect sticks
- Use a non contact sensor and magnets
- No physical friction in the sensor
- Much lower wear rate
According to the Adafruit Learning System, hall effect sensing works without physical contact. That design reduces mechanical wear compared to potentiometers.
That is why drift often returns on older controllers.
If calibration still cannot hold center or circular movement feels uneven, the issue may be hardware wear, not calibration settings.
How to Choose a Good Repair or Refurb Seller
If you decide to repair or buy refurbished, check a few things first.
- Clear photos of the repair work
- Some form of warranty or guarantee
- A reasonable return policy
- Good seller ratings or reviews
These small checks help avoid bad repairs or low quality replacement controllers.
Warranty, Safety, and Legal Risks Before Opening or Modifying a Controller
Opening a controller may fix drift, but it also brings risk. Most manufacturers treat opening or modifying hardware as a warranty void action. That means the company may refuse free repair afterward.
According to Sony PlayStation Support, warranty and repair options depend on region and purchase status. So it is usually smart to check official support first before doing a DIY repair.
Also remember one important safety point. Controllers contain a Li-ion battery. If that battery gets punctured or damaged, it can cause fire or thermal runaway.
So before opening anything, slow down and check a few things.
Basic Safety Checklist
- Work on a clean desk to reduce ESD safety risks
- Ground yourself to avoid static electricity
- Use proper tools like small precision screwdrivers
- Never force open the controller shell
- Keep metal tools away from the Li-ion battery
- Avoid bending or puncturing the battery pack
- Disconnect power before touching internal parts
Even a small mistake near the battery can create a battery puncture risk.
Stop and Check Flow
Before opening the controller, follow this quick decision flow.
- Check if the controller still has warranty
- Contact the manufacturer for controller RMA options
- If support offers repair, use authorized repair service
- Only attempt DIY repair if the device is out of warranty
Taking photos before starting also helps. Record the serial number, controller condition, and screw locations.
RMA or DIY Repair?
Should you request RMA first
Yes. If the controller is new or still under warranty, manufacturer support usually handles stick drift.
When does DIY repair make sense
DIY repair makes more sense when the controller is out of warranty or repair costs are too high.
Just document everything first. Photos, serial numbers, and parts layout can save a lot of confusion during reassembly.
Final Steps After Controller Calibration
Once you finish controller calibration, the next step is simple. Check if the stick actually behaves better in real gameplay. Numbers inside tools help, but real movement inside games tells the truth.
I usually test the controller for 30–60 seconds without touching the stick, then play normally for 2–5 minutes. That short test often shows whether stick drift improved or not.
If everything feels stable, you can save the profile or store the calibration. If the results still feel off, it is better to adjust again before saving permanent changes.
FAQs
Why is the Done button locked during range calibration?
The Done button stays locked because the tool is still collecting sampling data during range calibration. The system records stick movement to learn the full travel range.
This step takes a short time. The Done button unlocks after about 15 seconds once sampling finishes. Pressing Done earlier can save incomplete calibration, which may lead to incorrect stick movement or drift.
What should I do if range sampling looks stuck or the progress bar does not move?
If range calibration sampling stalls or the progress bar stops, the issue is usually connection or software related.
Try these steps:
Try 1
Use a wired USB connection instead of Bluetooth.
Try 2
Rotate the sticks slowly around the full edge for about 15–20 seconds.
Try 3
Close other controller apps such as Steam or DS4Windows.
Try 4
Try a different USB port or cable.
Try 5
Disable USB power saving in device settings.
These steps usually restart the sampling process.
Should I use temporary calibration or permanent calibration?
Use temporary calibration first.
Temporary calibration lets you test stick behavior without saving the changes. This helps confirm that the calibration actually fixes the issue.
Use permanent calibration only after in game verification shows the controller works correctly.
Simple workflow:
Run temporary calibration
Test gameplay for a few minutes
Save permanent calibration if results look stable
Why does my controller still drift after calibration?
Stick drift after calibration usually means the problem is not only software.
Common causes include:
Game deadzone settings that override calibration
Hardware wear in the stick module
Calibration saved before proper testing
Run an in game drift test and leave the stick untouched for 30–60 seconds. If drift still appears, the stick hardware may need repair or replacement.
Can a low battery cause calibration errors?
Yes. A low battery can cause failed tests or incorrect calibration.
Controllers often enter power saving mode when battery levels drop. That can interrupt calibration or produce unstable stick readings.
To avoid this:
Keep the internal battery charged
Use a wired connection during calibration
Do not disconnect the controller while calibration runs
Stable power helps ensure accurate calibration.
When should I stop calibrating and repair or replace the controller?
Calibration cannot fix hardware damage. If these symptoms continue, repair or replacement is usually the better option:
Severe or constant stick drift
Stick cannot hold the center position
Drift returns quickly after calibration
Stick movement feels loose or uneven
Possible fixes include:
Potentiometer replacement: about $10–$40
Hall effect upgrade: about $40–$120
Refurbished controller: about $30–$80
Will opening a controller void the warranty?
Yes. Opening or modifying a controller usually voids the manufacturer warranty.
If the controller is still covered, request authorized repair or start a controller RMA through the manufacturer.
DIY repair is safer only after the warranty period ends.