
Analog Stick Test
Test left and right analog sticks online. Check movement, center position, and possible stick drift in real time.
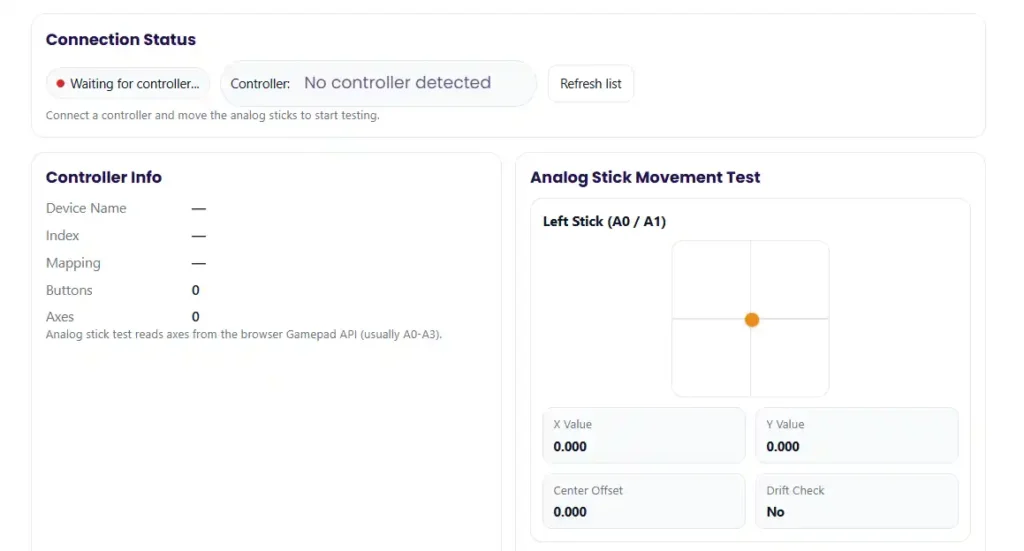
Connection Status
Connect a controller and move the analog sticks to start testing.
Controller Info
Analog stick test reads axes from the browser Gamepad API (usually A0-A3).
Analog Stick Movement Test
Tip: Release the sticks and check whether values return close to 0.000. A high center offset can indicate stick drift or calibration issues.
Well, here’s the deal. An analog stick tester checks how your controller stick moves and sends input. I use a controller test or joystick tester to see problems like stick drift, a bad deadzone, slow snap back, or a stick that cannot reach full range. The tool shows axis values, so I can see if the stick sits at center or moves when it should not.
I run these tests on Xbox, PlayStation, Switch, and PC controllers. Sometimes I use a web tester, other times OS or platform tools. I’ll show quick tests and deeper checks so you can read the results, spot input lag, and decide what fix or calibration might help.
Key Takeaways
- I run an analog stick tester to spot stick drift, check deadzone size, confirm full stick range, and watch how the stick returns to center. A quick controller test often shows problems right away.
- I usually test in two places. First a web joystick tester, then an OS or platform tool. This helps rule out game settings that hide real controller issues.
- Stick drift shows movement when the stick rests. Deadzone problems show delayed response when the stick moves near the center.
- I try simple fixes first. Clean the stick area, run calibration, and adjust deadzone settings before replacing hardware.
- I save screenshots of axis values and test graphs. These help with warranty claims or repair checks.
- If the readings jump around or the stick cannot reach full range, hardware wear or dirt inside the module usually causes the issue.
What an Analog Stick Tester Checks (and What It Cannot)
I usually open an analog stick tester when a controller feels off. The tester shows how the stick moves on axis X/Y. Most tools display a crosshair or small graph. When the stick rests, the dot should sit close to the center point. When I move the stick, the dot should travel smoothly across the full range and then return to center fast. If the graph shakes or drifts, the tester may show jitter, slow stick return, or weak snap-back.
What a tester measures
- Axis X/Y movement and center point position
- Full stick range from center to edges
- Stick drift when the stick moves at rest
- Deadzone response near the center
- Snap-back speed when the stick releases
- Small signal noise or jitter
- Input updates affected by polling rate
What a tester cannot fully confirm
- Game engine smoothing or hidden deadzone settings
- Controller driver behavior inside the OS
- Connection problems like Bluetooth latency
- Game-specific sensitivity or response curves
One rule I follow: test the controller in two tools before blaming hardware.
Quick Start: 2 Minute Analog Stick Test (Most People Start Here)
I usually run a quick test first. It takes about two minutes and shows if the controller has drift, range problems, or slow stick return.
- Connect the controller to your PC. I prefer USB because it avoids wireless delays and signal drops.
- Open a tester page and Run the analog stick test.
- Do nothing for a few seconds. Watch the dot on the screen. It should stay near the stick center. If it moves on its own, that points to drift.
- Slowly move the stick in a straight line up, down, left, and right. Check if it reaches the full range.
- Now move the stick in slow circles. Look for smooth circularity without jumps or flat spots.
- Push the stick fully to each edge. Make sure it reaches the full edge reach in every direction.
- Release the stick and watch it reset to center. A healthy stick snaps back quickly.
- Repeat the same checks on the other analog stick.
I usually record a short video or take screenshots of the results. That proof helps a lot for warranty claims or repair checks later.
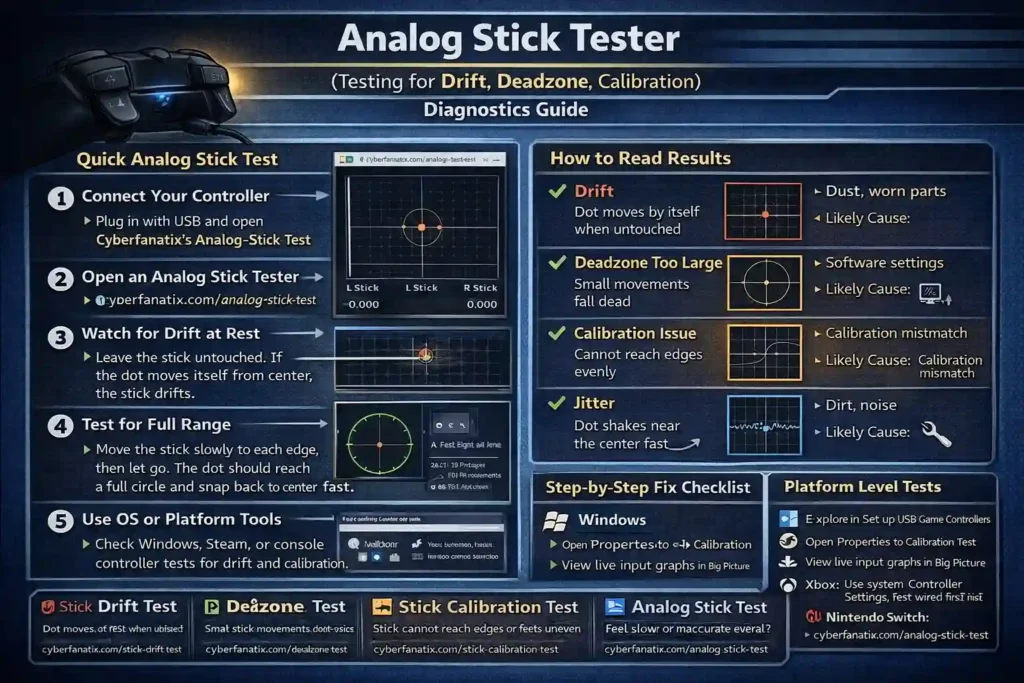
How to Read Test Results: Drift vs Deadzone vs Calibration Issues
I usually run a stick drift test or deadzone test and then watch how the dot behaves on the graph. The movement pattern tells a lot about what’s wrong with the controller. Small changes in the graph often point to drift, deadzone settings, calibration problems, or signal jitter.
Stick Drift
Drift appears when the stick moves even though I do not touch it.
Signs I look for:
- The dot sits away from the center
- The graph slowly moves on its own
- Axis values show a small offset
What it usually means:
- Dust inside the stick module
- Wear in the internal potentiometer
- Small hardware damage after long use
If you want to check it directly, run a stick drift test.
Deadzone Too Large
A large deadzone hides movement near the center.
Common signs:
- Small stick movements do nothing
- The dot stays still until I push harder
- Movement suddenly jumps after a delay
What it usually means:
- Game or software deadzone settings are too high
- The game tries to hide small drift
You can verify this with a deadzone test.
Calibration or Range Problems
Calibration issues appear when the stick cannot reach the full edges.
Things I notice:
- The dot stops before reaching the edge
- One direction reaches farther than the other
- The graph shows uneven range mapping
What it usually means:
- Controller calibration mismatch
- OS input profile problems
- Driver or firmware settings out of sync
Running a calibration test often confirms this.
Jitter or Signal Noise
Sometimes the stick rests near center but the graph shakes.
Common signs:
- Small shaking lines on the graph
- Axis values jump quickly up and down
- Movement appears even while resting
What it usually means:
- Electrical noise in the signal
- Dirty stick contacts
- Early hardware wear
Quick Comparison
| Problem | What You See | Likely Cause |
| Stick Drift | Dot moves at rest | Dust or worn stick module |
| Deadzone Too Large | No response near center | Software deadzone settings |
| Calibration Issue | Cannot hit edges evenly | OS or controller calibration mismatch |
| Jitter / Noise | Shaky values at rest | Dirt, interference, or worn parts |
I usually confirm the problem in two testers before deciding the controller has a real hardware fault.
Web Based Testing in a Browser: What You’ll See and Why It Helps
I often start with a quick browser controller test because it loads fast and shows movement right away. A web tester reads controller signals through the Gamepad API, which lets the browser display raw input like stick movement and axis values. When I move the stick, the screen shows a dot or graph that tracks the motion. This makes it easy to see drift, center offset, or range problems in seconds.
You can try an online analog stick tester here.
More technical details about how browsers read controller inputs appear in the MDN Gamepad API documentation.
Pros of Browser Testing
- Fast to open. No software install needed
- Shows live axis values and button input
- Works in common browsers like Chrome, Edge, and Firefox
- Good visual graphs make drift and jitter easy to spot
Limitations
- Browser behavior can vary across Chrome, Edge, or Firefox
- OS drivers may change how input appears
- Bluetooth connections may introduce delays or unstable signals
- Some testers refresh data at different rates
Best Practices I Follow
- Use a USB connection when possible. It gives more stable results than wireless.
- Refresh the page before each new test so the input resets.
- If results look strange, try the test in another browser.
- Confirm the results using system tools like Windows controller settings or the Steam controller test.
I treat browser tests as a fast first check. After that, I usually verify the results with OS or platform tools to be sure the problem is real.
Platform and OS Tests: More Reliable for Troubleshooting
I trust OS tools and platform tests more than game tests. These tools read input at the system level. That means they show controller signals before any game settings change them. A game might hide drift with a large deadzone, but Windows controller settings, Steam controller test, or console input diagnostics usually show the real behavior.
This helps confirm if the problem comes from the controller itself or from game settings. I often test here after a web test.
If a web test and OS test show different results, I usually check:
- USB cable or Bluetooth connection
- Browser behavior or page refresh
- Controller drivers or firmware updates
Running tests at the system level gives a clearer picture before trying calibration or repairs.
Windows: Built In Controller Test and Calibration
Windows includes a simple controller testing tool. I use it when I want to see how the stick behaves outside games.
Steps
- Connect the controller to the PC. USB works best.
- Open the Start menu and search Set up USB game controllers.
- Select your controller from the list.
- Click Properties to open the testing panel.
- Move the sticks and watch the crosshair respond.
- Press buttons to confirm they register correctly.
- If movement looks wrong, open the calibration wizard.
What good behavior looks like
- Crosshair rests close to the center when untouched
- Movement follows the stick smoothly
- The stick returns quickly to center after release
If I run calibration, I always record the behavior first. Screenshots before and after help confirm whether the calibration wizard actually improved the input.
Steam Input: Visual Test, Deadzones, and Controller Calibration
Steam offers one of the best controller testing tools. I use it as a second opinion after Windows testing.
Steam’s Steam Input system shows live stick graphs and allows controller calibration and deadzone settings changes.
Things I usually check:
- Stick movement graphs in Big Picture mode
- Whether the stick rests at center
- How the stick behaves during fast movement
- Deadzone adjustments in the controller settings
Steam profiles can override controller behavior. So sometimes a game profile changes how the stick feels.
Before adjusting anything, I usually save a baseline profile. That way I can return to the original settings if the change makes aiming worse.
PlayStation, Xbox, and Switch: Checking Console Settings
Console systems also provide basic controller checks through console settings or system menus.
Here is what I usually try first.
Xbox
- Open controller settings in system settings
- Test stick movement in menu navigation
- Check for a controller firmware update
- Try wired mode to rule out wireless issues
PlayStation
- Move through system menus and watch stick response
- Reset the controller using the small back reset button
- Update controller firmware if the system prompts it
- Test the stick inside multiple games
Nintendo Switch
- Open controller settings and run stick calibration
- Watch stick movement during the calibration screen
- Update controller firmware if available
- Try both docked and handheld modes
If stick drift appears in menus and multiple games, I usually stop troubleshooting. At that point the problem likely comes from hardware wear or contamination inside the stick module.
Deadzone Explained (Simple): Choosing a Deadzone That Stops Drift Without Hurting Aim
So here’s how I think about deadzone. It creates a small space around the stick center where tiny movements get ignored. This helps stop small drift, but too much deadzone makes the controller feel slow. The trick is finding the smallest value that fixes the problem without hurting aiming or sensitivity.
If you want to check how your controller behaves, you can test your controller deadzone here.
How I Tune Deadzone
- Start with the default game settings.
- Leave the stick still and watch for drift.
- Increase the inner deadzone slightly.
- Test movement again. Stop increasing once the drift disappears.
- Move the stick slowly and check how it feels when aiming.
- If the game supports it, adjust the outer deadzone so the stick still reaches full speed at the edges.
Why Too Much Deadzone Feels Bad
Large deadzones delay small stick movements. That makes the response curve feel sluggish. Precise aiming becomes harder because the game ignores small adjustments near the center.
Quick Symptom Guide
- Stick drifts at rest → Increase inner deadzone a little
- Aiming feels slow → Reduce deadzone slightly
- Top speed feels limited → Adjust outer deadzone
- Movement feels jumpy → Check sensitivity and response curve
One thing I always do is write down the smallest deadzone that stops drift. That number becomes a good baseline if the stick wears down later.
Stick Drift Causes (Hardware and Software) and What Test Results Reveal
I’ve seen stick drift come from both software settings and real hardware wear. That’s why I always test first before opening the controller. A simple test usually shows patterns like center offset, unstable jitter, or weak stick range. Those clues point to different causes.
One thing to remember. Drift often gets worse over time. Small potentiometer wear or dust inside the controller module slowly changes how the stick reports movement. Also, one game may hide drift while another shows it clearly because each game uses different deadzone settings.
Common Causes I Check First
- Potentiometer wear inside the analog stick
- Dust or debris trapped in the stick module
- Small physical damage after drops or heavy use
- Outdated controller firmware
- Wireless signal interference from Bluetooth devices
- Game settings with very small deadzones
- Input smoothing inside certain games
Some newer controllers use Hall effect sensors instead of traditional potentiometers. Those designs reduce mechanical wear and often resist drift longer.
Before assuming hardware failure, I follow a simple order:
- Update controller firmware
- Test the controller with a wired connection
- Run a system level controller test
- Only then suspect hardware damage
Cause → Symptom → Next Step
| Cause | Symptom in Test | Next Step |
| Potentiometer wear | Slow center offset | Increase deadzone or replace module |
| Dust or debris | Random jitter or noisy axis values | Clean around stick area |
| Bluetooth interference | Input spikes or unstable movement | Test using USB cable |
| Firmware issues | Inconsistent response across apps | Update firmware |
| Game deadzone settings | Drift in one game only | Adjust in game settings |
For deeper technical context about joystick input signals and axis mapping, the USB specification explains how controllers report axis movement.
Fix Options: What to Try First (Safe) vs When to Repair or Replace
When I see stick problems, I always start with the safest fixes. Opening a controller too early can void the warranty and make repairs harder. So I follow a simple path from low risk to more involved solutions.
Step by Step Fix Checklist
- Clean the outside of the stick area
Dust and small debris often cause minor drift. I gently clean around the stick base using a soft cloth or compressed air. - Reconnect or re pair the controller
I remove the controller connection and pair it again. Wireless settings sometimes cause strange input behavior. - Update controller firmware
Firmware updates can fix input problems and improve stability. - Run calibration
I run a quick stick calibration test to check the axis range and center point. - Adjust the deadzone
Increasing the inner deadzone slightly can hide small drift while keeping aiming responsive.
When to Consider Warranty or Service
If drift appears in multiple tests and games, I usually stop tweaking settings.
At that point I check for:
- Active warranty coverage
- Official RMA or repair service options
- Manufacturer troubleshooting guides
Evidence I Collect Before Support Requests
Support teams usually ask for proof, so I keep a small record:
- Controller serial number
- Purchase receipt or order date
- Screenshots or videos from test tools
- Notes about the tests I ran
This information speeds up the controller repair process.
DIY Repair (If You’re Experienced): What’s Involved and Risks to Know
Some people choose to repair the controller themselves. I only recommend this if you have experience with electronics.
Common things involved in a repair:
- Opening the controller teardown carefully
- Disconnecting fragile ribbon cables
- Removing the analog joystick module
- Installing a compatible replacement part
- In some controllers, small soldering work
Risks I always keep in mind:
- Opening the controller may void the warranty
- Small cables and connectors break easily
- The wrong replacement module may not fit the controller model
If someone decides to try a repair, I suggest checking a reliable guide first and confirming the exact controller version. Trusted repair instructions appear here.
Troubleshooting Checklist: When Test Results Look Wrong
Sometimes a controller test shows strange results. I’ve seen graphs jump, sticks refuse to center, or axis readings change every refresh. Before assuming the controller is broken, I run a quick checklist. Many times the problem comes from connection issues, software settings, or background tools.
Connection Checks
- Try USB vs Bluetooth. I usually switch to USB first because it removes wireless instability.
- Change the USB port on the PC. Some ports behave differently.
- Disconnect other wireless devices that may cause signal interference.
- Restart the controller and reconnect it.
Software Checks
- Close any remapping software like controller mappers or overlays.
- Temporarily disable or standardize Steam Input settings.
- Check for controller firmware updates.
- Watch for apps that add an input overlay or modify controller behavior.
Environment Checks
- Close extra background programs that read controller input.
- Restart the browser or testing tool.
- Test in another browser if the tester behaves oddly.
Controller Checks
- Run the test again and compare the stick drift test results.
- Move the stick slowly and watch for consistent axis movement.
- Perform a control test with a second controller if possible.
If the second controller works normally in the same test, the first controller likely has a real hardware issue.
Reddit and Forum Tips: What Actually Helps (and What Usually Doesn’t)
I’ve read a lot of Reddit advice and forum threads about controller drift fixes. Some community troubleshooting tips work well. Others fall into the category of common myths. The trick is sticking to low risk steps that you can repeat and test.
Tips Users Report as Helpful
- Run tests in more than one tool. Many people compare results using an analog stick tester and system tools.
- Check stick response using a deadzone test to see how small movements behave.
- Increase the inner deadzone slightly to hide minor drift.
- Clean around the stick base carefully using air or a soft brush.
- Update controller firmware before assuming hardware failure.
- Use the warranty or official service if the controller is still covered.
Tips That Are Risky or Often Useless
- Spraying large amounts of cleaner directly into the stick module
- Forcing the analog stick hard in different directions
- Installing random calibration programs without recording baseline results
- Taking the controller apart immediately without testing first
- Following fixes that lack proof or repeatable testing
A Quick Tip for Asking the Community
When I ask for help in forums, I include a few details. This usually leads to better answers.
- Controller model and platform
- Where the drift appears
- Screenshots or graphs from test tools
- The fixes already tried
Clear information helps others give useful advice instead of guessing.
Recommended Tooling Hub (Internal): Run the Right Test for Your Symptom
When a controller starts acting strange, I usually run the right test based on the symptom. This makes troubleshooting faster. Instead of guessing, I check the issue directly with a focused tool. These tests help with diagnosing, verifying a fix, or documenting results for warranty claims.
Here’s the simple way I approach it.
- Stick moves on its own at rest → Run a Stick drift test
- Small stick movements don’t register → Run a deadzone test to check center response
- Stick cannot reach edges or feels uneven → Run a stick calibration test
- Controller feels slow or inaccurate overall → Run a full Analog stick test
- After making adjustments or repairs → Run the same test again to confirm the fix
I usually start with the symptom I notice first. Then I repeat the test after each change so I can clearly see whether the problem improved.
Conclusion: Confirm the Problem, Apply the Least Risky Fix, and Retest
When a controller starts behaving oddly, I avoid guessing. I run a test first, check what the results show, and then try the safest fix. Small issues often improve with deadzone adjustment or simple calibration. But the important step is to retest after every change. That confirms whether the fix actually worked.
FAQs
How do I test my analog stick for drift?
Connect the controller and open a stick drift test,
Leave the stick untouched for a few seconds.
Watch for movement or center offset.
Confirm results in another tester.
If the dot moves while resting, the joystick is drifting. Save a screenshot for warranty proof.
What’s a normal deadzone, and how do I know mine is too big?
A normal deadzone depends on the game and controller. If it is too large, small stick movements near the center do nothing.
Signs:
Delayed movement while aiming
Stick feels slow near center
Test and adjust the inner deadzone gradually.
Why does my stick look fine in one game but drifts in another?
Games use different deadzone settings, response curves, and sensitivity values. Some games hide small drift with larger deadzones. Others show it clearly.
That’s why I usually test outside the game using a consistent tester to establish a baseline.
Can calibration fix drift permanently?
Sometimes controller calibration helps if the stick mapping is off.
Helps when the center or range issue is incorrect
Does not fix severe jitter or worn hardware
Always retest after changes. I compare results using a stick calibration test.
Is a web-based analog stick tester accurate?
A browser gamepad test gives quick visual results using the Gamepad API, but accuracy depends on the browser and OS layer.
To improve accuracy:
Use USB instead of Bluetooth
Test in another browser
Confirm results with OS or Steam tools
When should I replace the analog stick instead of tweaking deadzones?
Consider replacing the stick if:
Drift appears in multiple testers
Severe jitter occurs at rest
The stick cannot reach full range
How do I share controller test results on Reddit without leaking personal info?
Before posting screenshots:
Crop usernames and notifications
Hide serial numbers or device IDs
Show only the test graph or axis values
Blur personal info
Simple post template:
Device:
Platform:
Problem:
Tests run:
Results: