
Controller Vibration Strength Test
Test controller vibration strength online in your browser using the Gamepad API. Check whether rumble / haptic feedback is supported and send light, medium, strong, or custom vibration pulses.
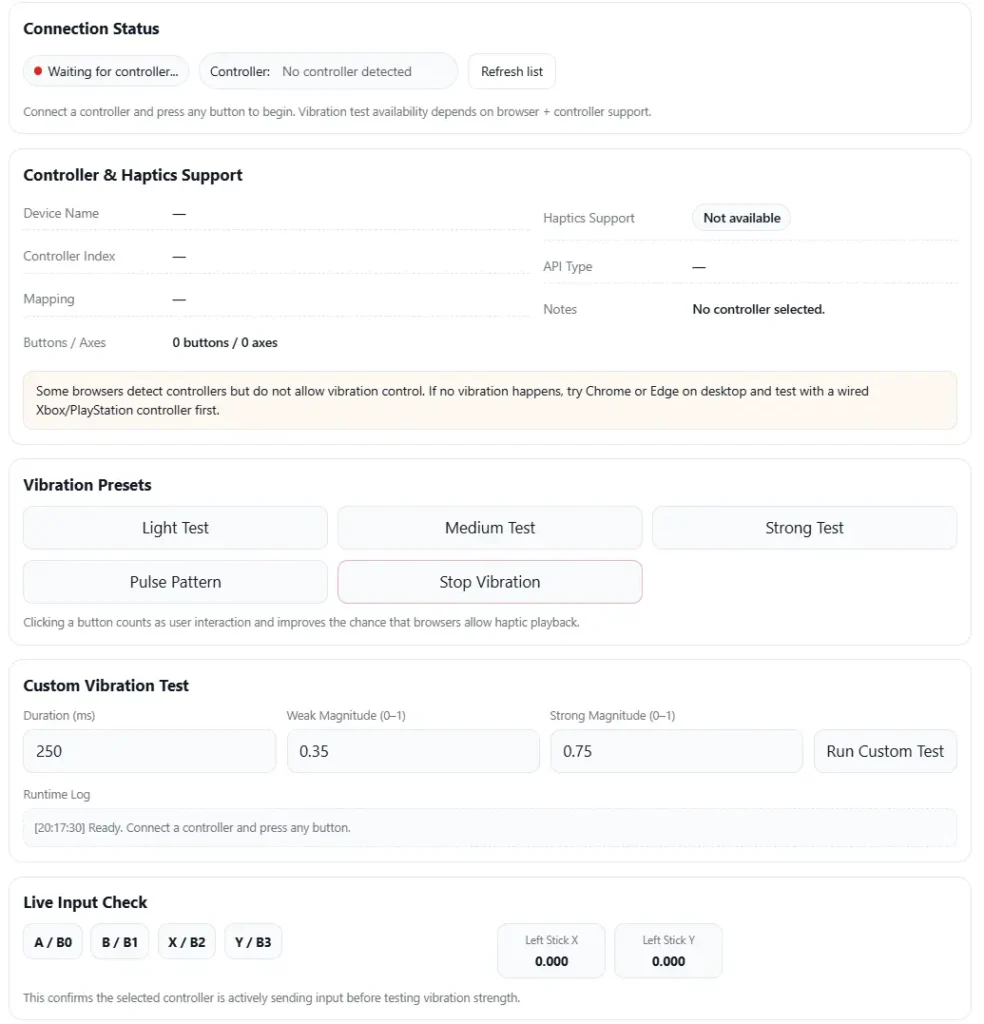
Connection Status
Connect a controller and press any button to begin. Vibration test availability depends on browser + controller support.
Controller & Haptics Support
Vibration Presets
Clicking a button counts as user interaction and improves the chance that browsers allow haptic playback.
Custom Vibration Test
Live Input Check
This confirms the selected controller is actively sending input before testing vibration strength.
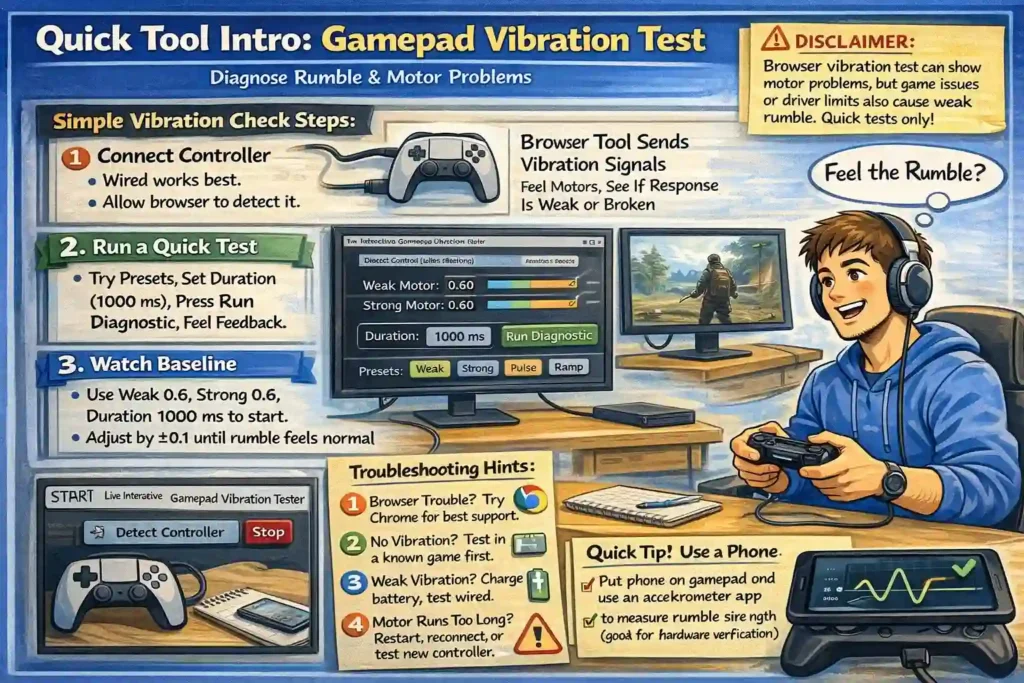
I’ve seen this happen a lot. You press a trigger in a game, something big happens on screen, but the controller rumble feels weak or does not work at all. That usually means something is wrong with the vibration system. A quick gamepad vibration test can help check if the controller motors respond correctly.
I usually start with a simple browser vibration diagnostic. Connect the controller, run a short test, and feel the rumble response. From there, it becomes easier to see if the issue comes from the game, the drivers, or the controller hardware itself.
Live Interactive Vibration Tester: Controls, Presets, and Baseline Setup
I usually start the interactive vibration tester to check how the controller motors respond. The tool sends signals through the browser using the vibrationActuator system. It lets me test the weak motor and strong motor separately. Intensity runs from 0.00 to 1.00, and the vibration time uses duration (ms) settings.
Main controls in the tester
- Detect Controller
Finds the connected controller so the test can start. - Stop
Stops vibration immediately if the rumble keeps running. - Weak Motor slider
Controls the light vibration motor. - Strong Motor slider
Controls the heavy rumble motor. - Duration (ms)
Sets how long the vibration runs in milliseconds (ms). - Presets
Loads quick test patterns so you can compare results faster. - Run Diagnostic
Starts a full rumble test sequence.
Quick baseline calibration
- Set weak motor 0.6 and strong motor 0.6.
- Set duration 1000 ms and press run diagnostic.
- Adjust the intensity by ±0.1 until the rumble feels normal.
Disclaimer: How the Tool Works and Its Limits
I should mention one thing before testing. This tool uses the Gamepad API, and everything runs with local processing in your browser. But results can change depending on the browser, OS, controller model, and drivers. Some systems simply do not expose rumble properly. Also, long high power tests can cause battery drain and small motor wear. And opening the controller for fixes may affect the warranty. I usually keep vibration tests short, just a few seconds at a time.
How Controller Vibration Works: Weak vs Strong Motors and Haptic Systems
Well, here’s the simple idea. Most controllers use haptic feedback so you can feel what happens in a game. Inside the shell, small motors spin and create vibration. Many controllers use dual-rumble systems, so two motors run at different strengths. The browser sends signals through the vibrationActuator, and the motors respond.
You may also hear about ERM motors or LRA systems. ERM motors use a small spinning weight. LRA or voice-coil systems create more precise vibration.
Common motor roles
- Weak motor (high-frequency motor)
Creates light, fast vibration. Think small footsteps or light impacts. - Strong motor (low-frequency motor)
Produces deeper rumble. Like explosions or heavy crashes.
One more thing I’ve noticed. Motor placement inside the controller shell can change how strong vibration feels. The way you hold the controller or grip it can affect what your hands feel.
Browser API Basics: How the Gamepad API Triggers Controller Rumble
I’ve tested this a few times while checking controllers in the browser. The browser sends vibration commands using the vibrationActuator feature. It runs the playEffect method with the dual-rumble setting. But the final result still depends on the browser and system drivers, so the same command may feel slightly different on different controllers.
Main parameters used
- weakMagnitude
Controls the weak motor vibration strength. - strongMagnitude
Controls the strong rumble motor. - duration
Sets how long the vibration runs.
Example check before sending vibration:
const gp = navigator.getGamepads()[0];
if (gp && gp.vibrationActuator) {
gp.vibrationActuator.playEffect(“dual-rumble”, {
weakMagnitude: 0.5,
strongMagnitude: 0.5,
duration: 1000
});
}
According to MDN Web Docs, the Gamepad API defines how browsers send vibration signals to controllers, though hardware and drivers still affect the final rumble behavior.
Proper Vibration Test Method: Repeatable Steps and Test Patterns
I’ve learned something after testing many controllers. If the test steps change every time, the results become messy. So I follow the same method each time. A small warm-up, then a few repeatable vibration patterns. This makes it easier to notice problems like delayed start, uneven strength, or a silent motor.
Environment and Preparation (Fast Checklist)
- Use a quiet room
Noise can hide subtle vibration sounds. A quiet room helps you notice motor noise or delay. - Use a wired connection or charge the controller
Low battery or unstable wireless signals can weaken rumble output. - Run a warm-up for 5 to 10 seconds
A short warm-up spins the motors before real testing. Cold motors sometimes feel weaker. - Hold the controller normally, then try a flat surface
Grip changes how vibration feels. Testing in your hands and on a table helps confirm the real strength.
Test Types and Vibration Patterns (What Each Reveals)
- Static intensity test
Runs steady rumble at fixed levels like 0.2, 0.5, 0.8, and 1.0.
Helps check if vibration strength scales correctly. - Pulse test
Sends short bursts such as 100ms on / 100ms off.
Useful for spotting latency or delayed motor response. - Ramp test
Gradually increases intensity from low to high.
Shows non-linear response if the motor jumps instead of rising smoothly. - Alternating test
Switches between weak and strong motors.
Helps confirm that each motor works independently. - Diagnostic sequence
Runs several patterns automatically to detect failures quickly.
Standard test order I usually follow
warm-up → static intensity (low, mid, high) → pulse test → ramp test → alternating test → full diagnostic sequence.
Measuring Vibration Strength with a Phone (Simple Objective Test)
Sometimes vibration feels weak, but it’s hard to prove. So I like using a smartphone accelerometer for objective measurement. The phone sensor records tiny motion changes when the controller vibrates. That gives more repeatable results than guessing by feel.
Quick protocol I usually follow
- Install a basic accelerometer app on your phone.
- Place the phone flat on the controller shell and keep the position fixed.
- Run a baseline test at intensity 0.6 with duration 1000 ms.
- Test static levels like 0.2 / 0.5 / 0.8 / 1.0.
- Repeat each test three times and log the values.
- Compare results before and after fixes or firmware changes.
Small tip. Always keep the phone in the same spot. Movement changes readings.
| Pattern | What to record | Interpretation |
| Static 0.2 / 0.5 / 0.8 / 1.0 | accelerometer value | Strength should rise steadily |
| Baseline 0.6 | average vibration reading | Good reference point |
| Pulse test | peak vibration spikes | Shows response speed |
This method focuses on trends, not perfect numbers. If you want to test the sensor itself, you can try the Controller Accelerometer Test.
According to Android Developers’ power and performance documentation, phone power management can change sensor sampling behavior, which can slightly affect readings.
Reading the Results: Normal Behavior vs Warning Signs
I usually look for normal behavior first. The vibration should start fast, stop quickly, and scale smoothly when intensity changes. Weak and strong motors should feel different. If the controller responds right away and the strength increases step by step, things are probably fine.
But some results point to problems.
- Motor silent
Likely cause: motor failure or controller hardware issue.
Next step: test another controller or check warranty. - Delayed start
Likely cause: Bluetooth latency or browser delay.
Next step: switch to a wired connection and test again. - Weak vibration
Likely cause: driver limiting, low battery, or power settings.
Next step: charge the controller and update drivers. - Mechanical noise
Likely cause: worn motor or loose internal parts.
Next step: inspect hardware or consider repair. - Motor keeps running
Likely cause: software glitch or driver issue.
Next step: restart the browser or reconnect the controller.
When something looks wrong, I follow a simple diagnostic priority.
Test another controller → try wired vs wireless → switch browser or OS → update drivers or firmware → check for hardware repair.
Platform and Browser Support for Controller Rumble
I’ve tested controller rumble in many setups. And honestly, support changes a lot depending on the browser, OS, and drivers. Some systems expose vibration well. Others barely respond. So picking the right environment matters if you want stable results.
Browser support
- Chromium browsers
Usually the most reliable for rumble testing. - Chrome
Strong support for the Gamepad system on most devices. - Edge
Works similar to Chrome because it also uses Chromium. - Firefox
Partial support. Some controllers vibrate, others do not. - Safari
Limited support. Rumble features often fail or stay disabled.
Operating system notes
- Windows
Generally the most stable option because controller drivers are widely supported. - Android
Works fairly well with Chrome, especially through USB OTG. - macOS
Support can feel inconsistent depending on controller and browser. - Linux
Depends heavily on kernel drivers and system configuration.
If I want the most reliable setup, I usually test with a Chromium browser on Windows, or Chrome on Android.
Platform Troubleshooting Steps for Controller Rumble
I’ve run into many cases where rumble works on one system but fails on another. Usually the cause sits in the drivers, firmware, or system power settings. So I like to troubleshoot step by step. First isolate the connection, then check updates, then test the controller outside the browser.
A quick tip before starting. Write down a few details for support if needed.
Controller model, firmware version, OS version, browser version, and whether the test used wired connection or wireless.
Windows (Drivers, Power Management, and Browser Choice)
- Use a wired connection first
Plug the controller directly into USB. This removes Bluetooth delay and stability problems. - Update drivers in Device Manager
Open Device Manager, find the controller under Human Interface Devices, then check for driver updates. - Test with Chrome or Edge
Both browsers use the Chromium engine and usually handle controller rumble better. - Disable USB power saving
Go to Power Options → Advanced settings → USB selective suspend and turn it off. This stops Windows USB power management from limiting vibration.
macOS (Limitations and Isolation Steps)
- Try a wired connection
Some controllers behave better over USB than Bluetooth on macOS. - Test different browsers
Safari sometimes limits rumble features, so trying Chrome or another browser may help. - Avoid random third party drivers
Many unofficial tools cause problems instead of fixing them.
If rumble still fails, I usually test the same controller on a Windows machine. That quickly shows if the problem is hardware or system related.
Android (USB OTG and Power Saving Checks)
- Use USB OTG when possible
A wired USB OTG connection often produces stronger and more stable vibration. - Use Chrome on Android
It tends to support controller vibration better than other browsers. - Check battery optimization settings
Aggressive power saving or battery optimization can slow Bluetooth input and vibration timing.
According to Android Developers power and performance guidance, background limits and battery optimization can change how hardware behaves during runtime.
Linux (udev, Kernel Drivers, and Hardware Verification)
- Update kernel drivers
Many controller features depend on current kernel drivers and correct udev rules. - Use a Chromium browser
Chromium generally exposes controller vibration more reliably than other browsers. - Verify hardware outside the browser
Tools like jstest or SDL help confirm whether the system detects vibration hardware.
Example test command:
jstest /dev/input/js0
The device path can vary depending on the controller. If the hardware responds in these tools but not in the browser, the issue likely sits in the browser layer rather than the controller itself.
Driver Safety for Controller Rumble: Tools to Avoid and Safer Alternatives
I’ve seen many people install random controller tools just to enable rumble. That can be risky. Some old utilities modify driver signing settings or install unknown drivers. These tools sometimes cause system errors or security issues.
Security write ups published by Malwarebytes discuss risks linked to older driver tools such as MotioninJoy. Because of those reports, I usually avoid unmaintained packages and use trusted frameworks instead.
Tools I usually avoid
- MotioninJoy
Known for multiple MotioninJoy risks and security complaints. - Old SCPToolkit builds from unknown sources
Some downloads include modified drivers.
Safer options
- ViGEm
A maintained framework used to emulate controllers. - Official drivers from controller manufacturers.
According to the ViGEm official GitHub repository, the project provides maintained components for virtual controller drivers.
Simple safety checklist before installing drivers
- Download only from an official repository or trusted project page.
- Scan the installer with antivirus before running it.
- Create a system restore point in case the driver causes problems.
One more thing. Disabling driver signing should only be a last resort. I would only try that if I fully understand how to restore the system afterward.
Common Controller Vibration Problems and How I Fix Them
I usually start simple. If rumble fails, I follow a quick check path. This helps separate software problems from hardware damage.
Quick decision flow
- If no vibration, confirm the controller and browser support rumble.
- If weak vibration, check battery level and test wired vs wireless.
- If the motor will not stop, try a reset actuator or reconnect the controller.
- If one motor fails, the issue may require repair or warranty support.
No Vibration – Immediate Checks
- Confirm the controller supports vibration. Some models ship without rumble motors.
- Test in a known game or another app first. This helps rule out page issues.
- Switch browsers and try Chrome or Edge. These usually expose rumble better.
- Test another controller or device to isolate the problem.
Before contacting support, I write down the controller model and firmware version.
Weak Vibration – Power, Wireless, and Throttling
- Check the battery level and charge the controller fully. Low power can reduce motor strength.
- Test with a wired connection. Wireless sometimes lowers vibration output.
- Look for power-saving settings in the OS that may limit controller performance.
I also compare vibration strength at two battery levels and log the results.
Motor Keeps Running or Will Not Stop
- Press Stop in the test tool if available.
- Try a quick reset actuator call or reconnect the controller.
- Restart the browser or reboot the device.
If the problem keeps happening, the cause may involve firmware or internal hardware.
When reporting this issue, I record a quick video showing:
controller model, test pattern used, wired or wireless mode, and battery level.
One Motor Fails – Diagnosis and Next Steps
Sometimes only one rumble motor works. That usually means a hardware problem.
Possible options:
- Warranty claim if the controller still has coverage
- Repair, which may involve opening the shell and soldering a new motor
- Replace the controller if repair cost is too high
I always document the exact tests and results before requesting warranty service.
Copy and Paste Log Template for Support
When reporting a vibration problem, clear records help a lot.
| Field | Example |
| Controller model | DualShock 4 |
| Firmware version | 1.60 |
| Operating system | Windows 11 |
| Browser version | Chrome 120 |
| Wired or wireless | Wired |
| Battery level | 80% |
| Test pattern | Pulse / Static |
| Measured reading | Accelerometer value |
| Video link | optional evidence |
Simple bug report example
Controller model:
Firmware version:
OS and browser version:
Connection type (wired or wireless):
Battery level:
Test pattern used:
Observed result:
Accelerometer reading (optional):
Video link showing the issue:
This small CSV log or report makes troubleshooting much easier for support teams.
How I Spot Fake or Rebranded PS3 Controllers Without Real Rumble
I’ve seen many fake PS3 controller listings where the rumble does not work. Some sellers rebrand cheap pads and sell them as a counterfeit DualShock 3. So I usually check a few simple things before buying or testing.
Common signs that raise suspicion
- Missing or blurry Sony branding on the shell or label
- Odd product name or spelling on the packaging
- Controller feels lighter than expected in the hands
- Cheap plastic or loose buttons
- Unusual screws or uneven shell seams
- Listing description mentions no rumble or avoids mentioning vibration
One thing to remember. Some third party controllers are legit but ship with no rumble by design. So lack of vibration does not always mean fraud. But it does affect controller authenticity if the seller claims it is an original DualShock.
Quick tests I usually do
- Run a quick gamepad vibration test after connecting the controller.
- Compare the feel and weight with a known genuine controller.
- If buying online, ask the seller for a short rumble demo video.
I sometimes send a simple message like this:
“Can you show a quick video where the controller vibrates during a test?”
And yeah, I always check the return or refund policy before ordering.
Checking and Replacing PS3 Rumble Motors at Home
I’ve opened a few old controllers to fix vibration. Inside a DualShock 3, the rumble system uses small ERM motor units. ERM means eccentric rotating mass, which is a tiny motor with an off center weight that creates vibration.
Before starting, remember this. Opening the controller usually voids warranty.
Tools I usually use
- Small Phillips screwdriver
- Plastic pry tool
- Coin cell battery or low voltage power source
- Multimeter
- Tweezers
Basic DIY steps
- Power off and remove the battery
This prevents short circuits during the DualShock 3 teardown. - Open the controller shell
Remove the back screws and carefully separate the case. - Locate the rumble motors
The rumble motor units sit in small plastic housings near the grips. - Test vibration motor
Briefly touch a coin cell battery to the motor leads.
If the ERM motor spins, it still works. - Replace PS3 motor if needed
Disconnect the faulty motor and install a matching replacement. - Reassemble the controller
I take photos while opening it. That makes reassembly easier.
Stop here if
- The motor wiring looks damaged
- You smell burned electronics
- The controller PCB looks cracked
According to iFixit DualShock 3 teardown resources, careful disassembly helps identify worn vibration motors and internal connection problems.
Controller Care and When I Repair or Replace It
I’ve noticed controllers last longer with simple maintenance. Vibration motors, buttons, and the battery wear down over time. So a little care helps avoid bigger problems later.
Basic controller care
- Keep the controller clean and dry. Dust can affect internal parts.
- Avoid long high power vibration tests. Strong rumble causes extra vibration drain on the battery.
- Store the controller in a cool place so the battery stays healthy.
Power and hardware checks
- Watch the battery level during testing. Weak power can reduce vibration strength.
- If you open the controller for repair, follow ESD safety. Static electricity can damage the board.
- Some fixes require soldering, especially when replacing a rumble motor.
When to choose warranty, repair, or replacement
- Warranty
Best option if the controller still has coverage. - Repair
Good if the problem is small and parts are easy to replace. - Replace
Often cheaper for low cost controllers.
One habit that helps a lot. I run a short monthly diagnostic test with the same baseline settings. It makes early vibration problems easier to catch.
Notes for Developers: Adding Controller Vibration in Games and Apps
I’ve worked with vibration in a few small projects. One thing becomes clear fast. Good haptics should support gameplay, not overwhelm it. When developers use vibrationActuator.playEffect properly, players feel events like hits, footsteps, or explosions more clearly.
Still, every controller behaves a bit differently. That is why careful QA testing and simple accessibility options matter.
Design Principles for Haptics (Player Comfort and Options)
- Map vibration intensity to real events. Light actions use low intensity, big events use stronger rumble. This helps player comfort.
- Provide accessibility options. Some players prefer reduced vibration or no vibration at all.
- Use clear intensity mapping presets so players can adjust vibration easily.
- Keep continuous rumble short. A common comfort guideline keeps vibration under 2–3 seconds.
- Consider starting with vibration off by default and letting players opt in.
Implementation and QA Tips (Cross Controller Consistency)
- Build repeatable QA tests for vibration patterns.
- Run automated sequences like pulse, ramp, and alternating tests.
- Log controller model and actuator availability during testing.
- Test across multiple browsers and controller types.
- Keep effects in short bursts to reduce battery constraints and motor wear.
- Repeat tests during updates to catch regression problems.
Many developers reference behavior guides from MDN or the W3C Gamepad specifications to understand browser vibration behavior.
Web Example: Dual Rumble Pseudocode
const gp = navigator.getGamepads()[0];
if (gp?.vibrationActuator?.playEffect) {
gp.vibrationActuator.playEffect(“dual-rumble”, {
weakMagnitude: 0.4,
strongMagnitude: 0.7,
duration: 1000
});
}
This simple check confirms that the vibrationActuator exists before calling playEffect. If the actuator is missing, the code safely skips vibration instead of throwing an error.
Other Controller Tests You Might Want to Try
Sometimes vibration works fine, but the controller still feels off in games. I’ve seen that happen when other sensors behave incorrectly. Running another quick controller test can help find the real problem.
- Gyro test
Check motion sensors when camera movement feels strange. - Accelerometer test
Useful when tilt controls or motion input behave oddly. - Touchpad test
Helps when swipe gestures or touch inputs stop working.
Trying these quick checks often shows whether the issue comes from vibration or another controller sensor.
Final Thoughts on Gamepad Vibration Testing
I usually keep vibration checks simple. Start with a quick baseline test, then run a few patterns and record results if needed. Basic vibration testing helps confirm whether the issue comes from the game, drivers, or the controller itself. If something feels wrong, use simple diagnostics, check browser or system compatibility, and try safe fixes first. If problems continue, it may point to hardware health issues that need repair or warranty support.
One small tip I follow. Run a quick baseline vibration test before long gaming sessions or after major system updates.
FAQs
Why does my controller vibrate in games but not in this browser test?
This usually happens because browser support for the Gamepad API can differ. I usually try a Chromium browser like Chrome or Edge, use a wired connection, and check if the controller exposes the vibration actuator.
Can this vibration test damage my controller’s rumble motors?
Short vibration bursts are generally safe. But running long, high-intensity tests can increase battery drain and cause small motor wear, so I keep tests brief.
Why does vibration stop when I switch tabs or the browser goes into the background?
Browsers often pause hardware actions in the background. Background throttling and power-saving rules can interrupt vibration effects when the tab loses focus.
What are “weak” and “strong” motors in dual-rumble controllers?
Dual-rumble controllers use two motors. The weak motor creates lighter, higher-frequency vibration, while the strong motor produces deeper, low-frequency rumble. Either motor can fail independently.
How do I report a rumble problem to support (what info should I include)?
I usually include the controller model, firmware version, OS, browser version, and whether the test used wired or wireless. It also helps to attach the test pattern used and a short video or log showing the problem.
How can I tell if my PS3 DualShock 3 is counterfeit or a rebrand without real rumble?
Check for unusual branding, odd packaging, or a controller that feels lighter than expected. When buying online, I usually ask for a quick rumble demo video, and remember that some licensed third-party controllers ship with no rumble.
What third-party driver tools should I avoid for enabling PS3 or XInput rumble on PC?
I avoid old or untrusted installers. Tools with known security concerns should be skipped. I prefer maintained frameworks from official sources and always verify downloads first.
What’s the simplest objective way to measure vibration strength at home?
I place a phone on the controller and use a smartphone accelerometer app to record vibration. Keeping the phone in the same spot and logging results makes comparisons easier.