
Joy-Con Test
Test Nintendo Joy-Con buttons and stick input online in your browser. Works as a best-effort Joy-Con tester using the Gamepad API.
Connection Status
Connect a Joy-Con and press any button. If both Joy-Cons are connected, choose one from the dropdown.
Controller Info
Connect a Joy-Con (Bluetooth) and press any button to start. Left and right Joy-Con may appear as separate controllers.
Joy-Con Mapping Notes
Why labels can look wrong
Browsers may report Joy-Con buttons using generic or Xbox-style positions. This page shows a best-effort layout plus a raw input panel below.
Left vs Right Joy-Con
A single Joy-Con may expose only one stick and fewer usable buttons. If both Joy-Cons are connected, select each one from the dropdown to test separately.
If labels do not match your button presses, use the Raw Buttons / Axes panels to identify the exact browser mapping.
Joy-Con Input Test (Best-Effort Mapping)
Buttons (B0–B17 Highlights)
B6 / B7 Values & Sticks
Joy-Con browser mappings are inconsistent. This visual panel is a guide, but the raw panel below is the most reliable way to identify what your browser is reporting.
Raw Joy-Con Diagnostics
Raw Buttons (B0+)
Raw Axes (A0+)
Use this raw panel to troubleshoot button swaps, missing buttons, or unexpected mappings on Joy-Con controllers in different browsers.
I see this mix-up a lot in stores. Someone says their controller has Joy Con drift, but the problem is something else. Real Joy-Con drift happens when the analog stick sends movement even when nobody touches it. The stick sits in the center, but the system still reads input. That creates a center offset. On screen, a cursor or character moves slowly by itself. Some people call this phantom input.
According to teardown analysis from iFixit repair guides, Joy-Con sticks use small internal parts that wear over time. That wear can cause tiny signals even when the stick stays still. And that signal becomes drift.
But not every strange movement means drift. A lot of cases come from calibration issues, deadzone settings, or game behavior. That is why store testing matters before saying a controller is faulty.
Here are some common cases that look like drift but usually are not.
Symptom → Likely Non-Drift Cause
- Movement only happens in one game
→ Game input settings or special input curves. - Cursor shakes only a tiny bit near center
→ Small motion inside the deadzone range. - Stick pulls slightly to one side after system update
→ Controller calibration may be off. - Movement appears when controller battery is very low
→ Weak connection or unstable signal. - Input stops after recalibrating the analog stick
→ Misaligned calibration, not real drift. - Movement happens only in wireless mode near metal shelves or docks
→ Signal interference, not stick damage.
So the key thing I always check first is simple.
Hands off the analog stick. Watch the input screen.
If the pointer still moves and shows a clear center offset, that is real Joy-Con drift. If not, the problem probably sits somewhere else.
Tools and Setup for Consistent Store Testing
I’ve seen drift tests give different results just because the setup changed. One tech uses the Nintendo Switch calibration screen. Another uses a store tester page. Then the results don’t match. So the goal is simple. Use the same tools every time. That creates a clear baseline for testing.
Basic Tools Checklist
- Nintendo Switch console with updated system software
- Joy-Con controllers being tested
- Access to the Nintendo Switch calibration screen
- A reliable store tester page for stick input checks
- Customer ticket or system to record the controller serial
- Tripod or stable phone stand for recording test video
- Clean microfiber cloth to wipe the controller before testing
- Log sheet or digital system for test notes
Some stores also use web tools for consistent testing. Staff sometimes reference the CyberFanatix controller testing hub for input diagnostics.
Standard Test Environment Rules
Consistency matters more than fancy tools. I usually follow a few simple rules.
- Use the same Switch console for all drift tests.
- Use the same user profile and system settings.
- Use the same store tester or calibration screen each time.
- Keep the controller about the same distance from the dock.
- Avoid metal counters, tool trays, or strong magnets nearby.
- Start each test with clean hands and a clean controller.
- Place the console on a stable surface so movement does not affect input.
When these conditions stay the same, the test result becomes easier to trust. The stick behavior you see will reflect the controller, not the environment.
Standard Store Testing Protocol and Logging for Joy-Con Drift
I’ve seen drift tests go wrong when every employee uses a different method. One person tests in a game menu. Another uses the calibration screen. The result becomes messy. A standardized test protocol fixes that problem. Everyone runs the same steps, records the same details, and saves timestamped video.
The goal is simple. Reproduce drift in a way anyone in the store can verify later.
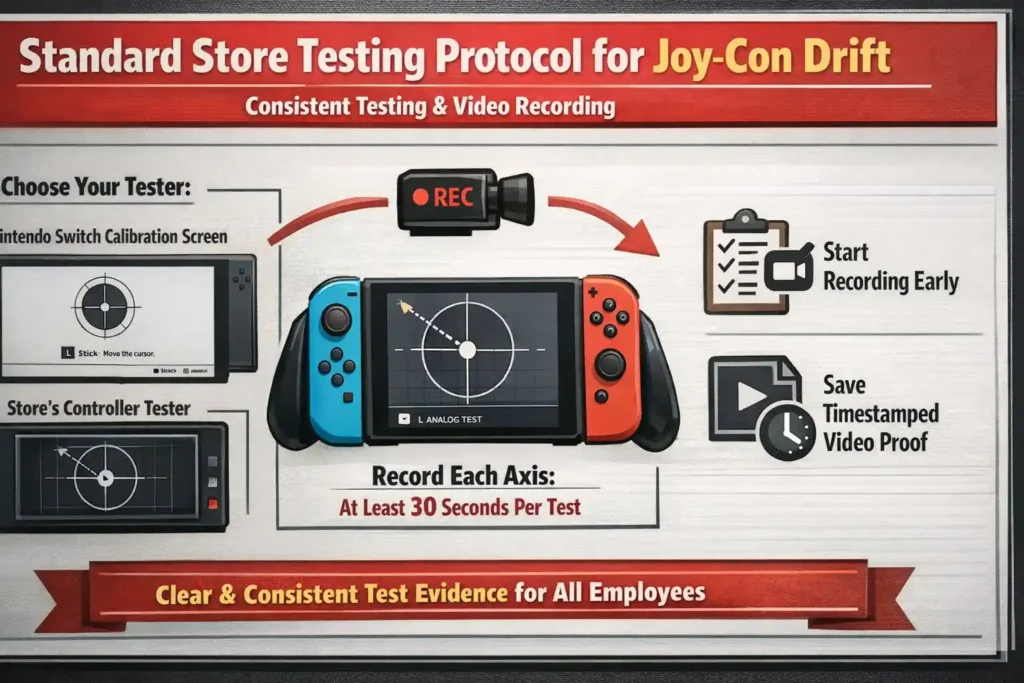
Every test should follow the same rule. Record at least 30 seconds per test axis and clearly note which tester you used. That means either the Nintendo Switch calibration screen or the store’s controller tester.
And yes, start recording early. Video proof saves time during disputes.
Step by Step Test Sequence (Repeatable)
- Visual inspection
Look at the controller first.
Check the stick cap, housing, and shell edges.
Signs to watch:
- Cracked plastic
- Bent stick cap
- Dirt or debris around the stick base
Record video now and show the controller condition.
- Controller pairing check
Open the Switch controller menu.
Confirm the Joy-Con connects correctly.
Check battery level and signal strength.
Mention on camera which tester you will use.
Example narration:
“Testing using Nintendo Switch calibration screen.”
- Calibration screen baseline
Open Nintendo Switch calibration settings.
Do not touch the analog stick.
Let the system show the center position.
Record the screen for a few seconds. This creates your baseline.
- Axis test with hands off stick
Start the real drift test.
- Watch the X axis first
- Then watch the Y axis
Hands off the stick.
Record at least 30 seconds per axis.
If the cursor moves by itself, you reproduced drift.
- Slow full range circles
Now move the analog stick slowly in a full circle.
Do this a few times.
Look for:
- Dead spots
- Delayed movement
- Sudden jumps
These signs show worn internal parts.
- Click in plus movement test
Press the stick down like a button.
Then move the stick again.
Some sticks show drift after a click because of internal pressure changes.
- Repeat on the second Joy-Con
Test the other controller.
Run the same steps again.
Consistency matters in a standardized test.
- Confirm in a neutral input screen
Open a simple menu or input screen.
Avoid games with special controls.
Watch the cursor again with hands off.
If the movement appears here too, drift becomes easier to prove.
Pass Fail Criteria (Store Friendly)
Use simple pass/fail criteria so every staff member makes the same decision.
Fail
- Cursor moves with no input during the 30 second axis test
- Movement continues after recalibration
- Drift appears across multiple testers or screens
Pass
- Stick returns to center with no movement
- Minor jitter stays inside the deadzone
Needs Retest
- Drift appears only in one game
- Movement shows only on one tester
- Low battery or connection issues appear
Escalation Flow
I usually follow a simple path after testing.
- Retest using the same protocol
- Repair or reseat if store policy allows
- Retest again using the same steps
- Return within store window if applicable
- Submit manufacturer claim with documentation
Minimal Log Template (Copy and Paste)
Use a simple log entry like this.
Test Record
Date and Time:
Store ID or Location:
Tester Used: (Switch calibration or store tester)
Console Firmware:
Test Environment Notes:
Controller Serial or Ticket ID:
Steps Performed:
☐ Visual inspection
☐ Calibration baseline
☐ X axis test
☐ Y axis test
☐ Circle motion test
☐ Click and movement test
☐ Second Joy-Con tested
Observed Behavior:
Example: “Cursor moves right with no input during X axis test.”
Video Filename:
Technician Initials:
Disposition:
Pass / Fail / Repair / Return / Escalate
Quick Triage: Common Causes of Joy-Con Drift (Wear, Contamination, Calibration, Connectivity)
I’ve noticed something in store testing. A lot of controllers get labeled as Joy-Con drift, but the real cause sits somewhere else. So before jumping to a repair or return, a quick triage check helps a lot. The goal is simple. Identify the likely cause first, then decide the next action.
Joy-Con sticks use small internal parts called a potentiometer. Over time, stick wear, dirt, or signal problems can affect how the analog stick reports movement. But calibration errors or wireless issues can also create the same symptoms.
Here is a simple store troubleshooting guide.
| Symptom | Likely Cause | Quick Check | Next Action |
| Cursor slowly moves with no input | Stick wear inside the potentiometer | Run calibration screen and watch center position | Retest. If movement continues, escalate repair or claim |
| Stick movement feels jumpy or rough | Dust or debris inside stick housing | Inspect base of stick for dirt buildup | Clean exterior area and retest |
| Drift appears after system update | Calibration error | Run recalibration in Switch settings | Retest using the same tester |
| Input delays or random movement | Bluetooth interference | Move away from dock, metal counters, or electronics | Retest in a cleaner signal area |
| Drift appears only wirelessly | Signal instability or low battery | Test again with charged controller | Retest and confirm behavior |
| Drift appears suddenly after update | System or controller firmware mismatch | Check for firmware updates | Update firmware and retest |
One important store rule. Do not open the device in store if policy does not allow it. Internal repair attempts can void warranties.
Instead, follow the normal path.
Retest → verify results → escalate to repair or manufacturer claim if needed.
This keeps the testing process fair and consistent.
When the Problem Is the Test Setup (Not the Controller)
Sometimes the controller works fine. The test setup causes the problem.
Here are a few things I always double check.
- Different testers used by different staff members
- Different deadzone settings between apps or systems
- Low battery causing unstable signals
- Heavy RF congestion from nearby wireless devices
- Testing too close to a dock or metal counter
- Multiple consoles using different firmware versions
When the setup stays consistent, drift testing becomes much easier to trust.
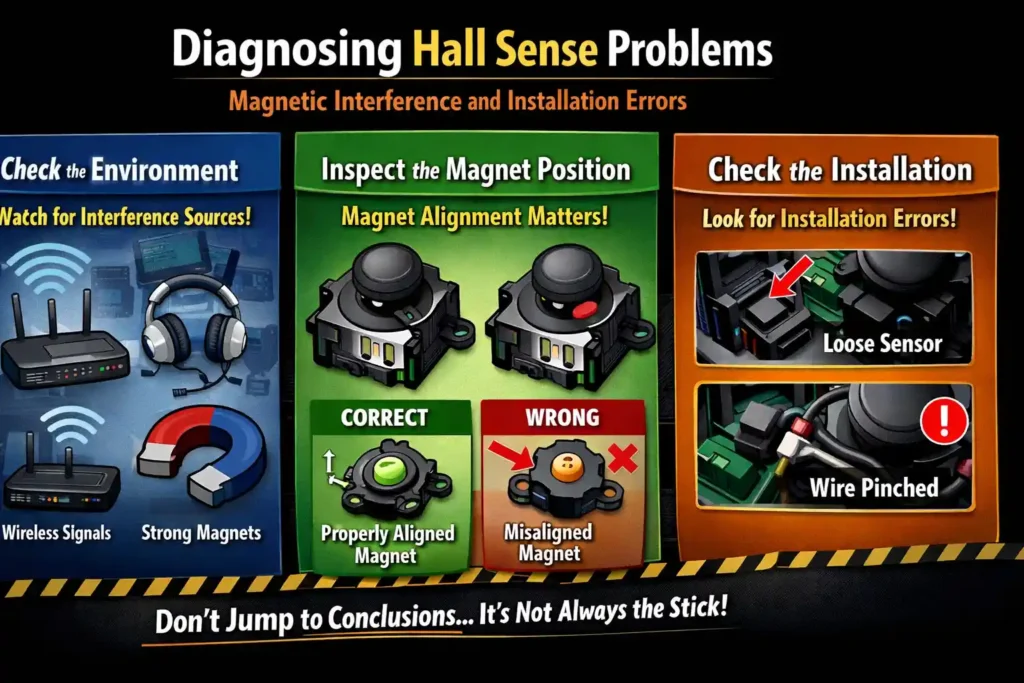
Diagnosing Hall Sense Problems: Magnetic Interference and Installation Errors
I’ve run into this situation a few times with Hall effect sticks. The controller looks new. The stick feels smooth. But the tester still shows movement. People call it hall sense drift, even though nothing inside the stick is worn.
Hall sticks work differently from normal analog sticks. A regular stick uses a potentiometer that wears down. A Hall stick reads magnetic field changes instead. A small magnet moves when the stick moves, and the sensor reads that magnetic change.
Because of that design, problems often come from magnetic interference, magnet orientation, or a small installation error.
You might see this when using aftermarket sticks like GuliKit modules.
So the real job during testing is simple. Check the environment, the magnet position, and the install before blaming the stick.
Why Hall Effect Sticks Can Drift Without Wear
According to Allegro MicroSystems, Hall sensors detect changes in magnetic field strength and direction. The sensor measures the magnet’s position, not physical contact between parts.
That means wear is not the main problem.
Other things can shift the reading.
Common causes include:
- A magnet installed with the wrong orientation
- A magnet sitting slightly too close or too far from the sensor
- Nearby metal or magnetic objects causing magnetic interference
- Shell pressure pushing the stick slightly off center
- Loose internal parts after a repair or shell swap
So yes, the stick can show drift even when nothing inside is worn.
Diagnostic Steps (Magnet, Interference, Install)
Follow these checks before assuming a faulty stick.
- Check nearby magnets
Remove magnetic phone cases, stands, or magnetic tools near the test area.
Small magnets can shift sensor readings.
- Look for metal debris
Tiny screws, metal filings, or tool fragments can affect Hall sensors.
Clean the area before testing again.
- Check magnet orientation
If the stick module was replaced, confirm the magnet orientation matches the manufacturer layout.
Incorrect polarity can shift the center point.
- Verify PCB alignment
Check the stick module sits flat on the board.
A tilted module can change sensor readings.
- Check ribbon cable seating
Loose ribbon cables can cause unstable input signals.
Reseat the cable if allowed by store policy.
- Check shell pressure
Sometimes the outer shell presses slightly on the stick module.
Test once with the shell loosened, then again after full assembly.
- Simple magnet distance test
Use a small magnet and move it slowly closer to the stick area.
Then move it away.
Watch the tester response. Hall sensors should react to magnet distance changes. That confirms the sensor still works.
Troubleshooting Table (Symptom → Cause → Action)
| Symptom | Likely Cause | Test or Action |
| Drift appears only in the store tester | Test environment interference | Move controller away from metal surfaces and retest |
| Drift begins after shell reassembly | Shell pressure or misalignment | Loosen shell screws and test again |
| Stick pulls diagonally even at rest | Magnet orientation error | Verify correct magnet direction during installation |
| Center offset increases near metal surfaces | Magnetic interference | Test in a clean environment away from metal tools |
| Input becomes unstable after module install | Installation error or loose cable | Reseat module and ribbon connection |
One small habit helps a lot here.
Use non magnetic tools, keep screws organized, and avoid metal debris near the controller.
Hall sticks rarely drift from wear. Most problems show up because of magnet alignment or environmental interference.
Evidence and Documentation Workflow for Retail and Warranty Cases
I’ve seen drift cases turn into a customer dispute just because the store had no clear proof saved. That is why a simple documentation workflow matters. When every test creates video, logs, and clear notes, the result becomes easy to review later.
The basic idea is simple. One controller test equals one record. All evidence stays together so anyone in the store or warranty team can verify what happened.
Most stores follow a single folder per ticket approach. Each repair or complaint gets its own folder. Inside that folder, staff place the video proof, the test log, and any notes about the controller condition.
What to Store for Each Test
- Drift test video recording
- Test log entry with technician notes
- Controller serial number or customer ticket ID
- Tester used during the test (Switch calibration or store tester)
- Brief test environment notes
- Final result (pass, fail, retest, escalate)
Keeping these items together helps protect the chain of custody. Anyone reviewing the case can see the same evidence that the technician saw during testing.
Folder Structure Example
Ticket Folder
• Test video files
• Drift test log
• Customer ticket or receipt record
• Technician notes
Retention and Access Control
Stores usually keep evidence for a set retention period based on company policy. During that time, the files help resolve warranty reviews or disputes.
Access should stay limited.
Only trained staff or managers should edit the log entries. Everyone else should have read only access. That protects the record and keeps the documentation reliable if a manufacturer review happens later.
Documenting Evidence for Warranty or Dispute Claims (Video, Logs, What Retailers Need)
I’ve seen cases where a store clearly reproduced Joy Con drift, but the warranty claim still failed. The reason usually comes down to missing proof. A clear process for warranty evidence avoids that problem. The idea is simple. Record the test, log the details, and keep everything tied to the same ticket.
For drift cases, video proof works best. Most stores record the test using 1080p at 30 fps (1080p30). That resolution shows stick movement clearly while keeping file sizes manageable. Stores often keep that footage for a minimum of 30 days, though each location may follow its own policy.
Every piece of evidence should match the log entry so the chain of custody stays clear. When a manufacturer review happens, the reviewer should see the same details your technician recorded.
What to Record (Minimum Evidence Checklist)
During the test, record the following details:
- Controller serial number or ticket ID
- Which tester was used (Switch calibration screen or store tester)
- Brief test environment note
- The steps performed during the test
- Visible calibration screen baseline
- Hands off the analog stick during the drift check
- The result of the test (pass or fail)
- Short audio narration or spoken timestamp if possible
A short narration helps a lot. It explains what the camera shows while the test happens.
Example narration:
“Testing Joy Con serial number X using the Switch calibration screen. Hands off stick now.”
Simple Video Script (What to Show on Camera)
A short sequence keeps the recording clear.
- Show the controller serial number or ticket label.
- Show the tester being used (calibration screen or store tester).
- Show the calibration center position.
- Perform the hands off drift test.
- Reproduce the drift behavior on camera.
- Mention the time and technician name if store policy allows.
That short script creates reliable timestamped logs and video evidence.
Example File Naming Convention
Use a naming system that links the video to the log entry.
Ticket1452_JC123456_2026-03-05_XAxis
Ticket1452_JC123456_2026-03-05_YAxis
Ticket1452_JC123456_2026-03-05_Calibration
This structure connects the evidence to the repair ticket.
Escalation Steps (Repair → Retest → Return → Manufacturer Claim)
Follow a clear path after collecting evidence.
- Attempt approved repair or reseating if store policy allows.
- Perform the same standardized drift test again.
- If drift remains, check the return eligibility window.
- If outside the return period, prepare a manufacturer claim with the evidence package.
External Authority Reference (Warranty and Repair)
According to Nintendo Support, customers can follow official repair and troubleshooting pathways for Joy Con control issues. Their process usually requests the controller serial number, a description of the problem, and clear proof of the behavior.
That means your evidence package should match what those repair systems expect. When the video, logs, and serial information all line up, the warranty review becomes much smoother.
Recommended Testing Pages for Other Controllers (Cross Training for Store Staff)
I’ve noticed something in busy stores. One technician knows how to run a stick drift test on a Joy Con, but struggles when a PlayStation or Xbox controller comes in. That slows down testing and creates inconsistent results.
A simple fix is cross training. Staff can use the same style of controller test tools across different consoles. The idea stays the same. Check stick movement, watch center position, and run quick input diagnostics before deciding if a controller has a real problem.
Many stores keep a short list of reliable gamepad tester pages so employees always use the same tools.
Here are some useful testing pages staff can use during controller checks:
- PS5 controller test
Use this when testing DualSense stick movement, trigger response, and button input. - PS4 controller test
Helpful for diagnosing stick drift or button issues on DualShock 4 controllers. - Xbox controller test
Used for modern Xbox controllers to check analog stick movement and button signals. - Xbox 360 controller test
Useful when older wired controllers come in for testing. - Nintendo Switch Pro controller test
Works well for checking stick response and drift on Pro controllers. - Joy Con drift tester
Used when diagnosing Joy Con analog stick behavior.
Using the same tools during training helps employees build consistent habits. When every technician follows the same testing approach, controller diagnostics across PlayStation, Xbox, and Switch become faster and more reliable.
Safety, Handling, and Quality Controls in the Store Environment
I’ve noticed testing mistakes often come from simple handling problems. A controller might pass one test and fail the next just because the setup changed. Good quality control helps prevent that.
According to NIOSH (CDC) guidance on workplace safety practices, standardized procedures and documented steps help teams produce consistent results and maintain accountability. That idea applies well to controller testing too. When staff follow the same safety and handling habits, drift results become easier to trust.
Basic Safety and Handling Rules
- Use ESD safety practices when handling controllers and internal parts.
- Keep the test area clean to avoid contamination from dust or debris.
- Use non magnetic tools when working near Hall effect stick modules.
- Store small screws and parts in trays to avoid metal debris near sensors.
- Clean the controller surface before starting a test.
- Keep liquids, magnets, and loose metal objects away from the test bench.
- Always perform a re test after any adjustment or repair step.
Do and Don’t List
Do
- Follow the same standardized testing protocol each time.
- Record results and test conditions in the log.
- Ask a second technician to repeat the test during disputed cases.
- Keep the test environment consistent.
Don’t
- Open a controller if store policy does not allow it.
- Use magnetic tools near Hall effect sensors.
- Change testers in the middle of a test.
- Skip logging steps after testing.
A simple two person verification helps during customer disputes. One technician runs the test first. A second technician repeats the same protocol. If both tests match, the result becomes much more reliable.
Final Thoughts on Joy Con Drift Testing Protocol
I’ve seen drift complaints turn messy when stores skip a clear process. A simple standardized protocol makes testing fair for both the customer and the technician. When staff follow the same steps, it becomes easier to confirm real drift reproduction, check Hall effect issues, and prepare clean documentation for a warranty claim. Small habits like recording each axis test for 30 seconds, capturing 1080p30 video, and keeping logs for about 30 days help build strong evidence.
FAQs
How do we reproduce Joy Con drift reliably in a store test?
I start a drift test on the Switch calibration screen or store tester. Then I leave the analog stick untouched. Watch the cursor carefully. If it moves by itself, drift appears. Record the screen and log the result. That creates clear proof for later review.
What is the difference between drift and a deadzone or calibration issue?
Real drift shows movement when the stick stays still. A deadzone hides tiny movement near the center. A calibration problem shifts the center position. I usually recalibrate first. If movement stops after calibration, the stick likely does not have true drift.
Why does a Hall effect stick show drift only on one tester or only in store?
I see this happen with Hall modules sometimes. Hall effect sensors detect magnetic field changes. Nearby metal tools, magnets, or shelves can affect readings. That creates Hall effect interference. Move the controller to a clean test area and run the drift test again.
How long should we record each axis to document drift?
Each axis needs enough time to show real behavior. I always record at least 30 seconds per axis. That means one recording for the X axis and one for the Y axis. This helps confirm movement without input during the drift test.
What video quality is good enough for warranty evidence?
Most stores record 1080p at 30 frames per second (1080p30). That resolution clearly shows the cursor movement. It also keeps file size manageable. Good lighting and a steady camera matter too when capturing warranty evidence.
What should be in a Joy Con drift log entry if a customer disputes the result?
A good log keeps the test transparent. I record the controller serial number, tester used, environment notes, and test steps. Then I add results and the video filename. These timestamped logs help protect the chain of custody if a dispute happens.
When should we escalate to a return versus a manufacturer claim?
I usually follow a simple path. First run the drift test and confirm pass or fail. If the controller sits inside the store return window, process the return. If the return window passed, submit a manufacturer claim with the recorded evidence.